Mold Removal Cleveland: A Practical How-To Guide
A practical, step-by-step mold removal Cleveland guide for homeowners and renters. Learn moisture control, safe cleanup, and prevention to protect health.

To remove mold in Cleveland homes, start by identifying moisture sources, seal off the area, and safely remove or clean contaminated material. This step-by-step approach emphasizes moisture control, PPE, and proper disposal—critical for safeguarding health and structure. Expect to use protective gear, verify ventilation, and test moisture levels after cleanup. The guide below aligns with best practices from Mold Removal Lab.
Understanding mold in Cleveland homes
According to Mold Removal Lab, mold growth is driven by persistent moisture and inadequate ventilation. In Cleveland, damp basements, crawl spaces, and bathrooms often become hotbeds for mold after long winters and humid summers. The Mold Removal Lab team emphasizes a practical, safety-first mindset: stop the water source, control humidity, and then address any visible growth. Homeowners and renters should approach mold removal Cleveland residents face with a plan that protects health and preserves structural integrity. Begin with a frank moisture audit—look for stains, musty odors, and water intrusion from leaks, condensation, or roof problems. If you find ongoing moisture, do not delay remediation; mold can reappear even after a cleanup if the root cause isn’t resolved.
In this guide, you’ll learn to identify moisture patterns in typical Cleveland homes, evaluate the extent of contamination, and apply field-tested methods to clean and dry surfaces safely. Remember, mold isn’t just an aesthetic issue—it can affect indoor air quality and trigger allergic reactions or respiratory symptoms. By prioritizing moisture control and proper cleanup, you reduce health risks and set the stage for lasting results.
Tools, materials, and safety protocols matter as much as the cleaning itself. The following sections cover practical steps, common pitfalls, and when to call in professionals for larger infestations. If you’re unsure about safety, seek local guidance or consult the Mold Removal Lab Team for recommendations specific to your home’s layout and materials.
Common mold species and what they mean in homes near Lake Erie
Molds vary in appearance and behavior, but their implications are similar: most indoor outbreaks relate to moisture. In Cleveland homes, common indoor molds include species like Aspergillus and Penicillium, which often grow on damp walls, insulation, and drywall after leaks or high humidity. Stachybotrys chartarum (black mold) is less common but can indicate sustained moisture and porous materials exposure. Identification by sight alone is not definitive, but recognizing typical patterns helps you decide the remediation path. If you see fuzzy growth on fabric, wood, or plaster, it’s worth treating as mold and addressing moisture right away. The Mold Removal Lab Team notes that containment and drying must accompany any cleaning to prevent cross-contamination and re-growth.
Color and texture aren’t reliable indicators of danger. Even white or greenish molds can pose health risks, particularly for children, the elderly, or people with allergies. A cautious approach—wear PPE, isolate the area, and clean using appropriate methods—minimizes exposure and spread. If you’re uncertain about the species or if growth is extensive, professional testing or remediation may be warranted. In most homes, the focus should be on moisture control, proper cleaning agents, and thorough drying rather than chasing a particular mold name.
Understanding what you’re facing helps you choose safer, more effective strategies. When you control moisture, you control the problem at its source. The goal is not only to remove visible growth but to prevent recurrence by maintaining a dry, well-ventilated environment. This aligns with the practical guidance you’ll find throughout this Cleveland-focused mold removal guide.
Moisture control: the foundation of effective mold removal
Moisture control is the keystone of successful mold remediation. In Cleveland, seasonal shifts can bring humidity spikes that fuel mold growth, especially in basements, laundry rooms, and bathrooms. Before any cleanup, establish a moisture baseline: check for leaks, inspect gutters, and ensure proper drainage away from the foundation. Use a hygrometer to monitor humidity; aim for indoor levels below 50% when possible, and lower during cleaning and drying processes.
Contain the work area to minimize dust and spores spreading to other rooms. Seal doors with plastic sheeting, turn off fans that recirculate air, and use a HEPA-filter vacuum to capture particles during cleanup (never run a HEPA vacuum on wet surfaces). Drying equipment like dehumidifiers and air movers should run continuously until the space reaches and stays below the target humidity for 48-72 hours post-cleanup. These moisture-management steps not only speed up drying but also reduce the risk of re-growth, which is the main reason mold returns after a cleanup. The Mold Removal Lab Team reiterates that moisture management is more important than the cleaning solution itself for long-term success.
As you implement drying measures, document humidity levels and visible growth. Consistent data helps you judge when it’s safe to reoccupy the space and, if needed, proceed with repair work. By taking moisture control seriously, you create an environment where mold cannot thrive and set the stage for durable improvements in air quality and home comfort.
Safe DIY steps you can take in small spaces
For small, surface-level mold in dry, non-porous areas (like tiles or sealed countertops), careful DIY cleaning can be effective and safe. Start with PPE: nitrile gloves, an N-95 respirator, safety goggles, and disposable coveralls. Ventilate the area well, using a window or mechanical exhaust to move air outside. Prepare a cleaning solution using mild detergent and water, or a basic EPA-registered disinfectant on non-porous surfaces. Avoid mixing cleaners—especially ammonia with bleach—as dangerous fumes can be produced.
Scrub moldy areas with a nylon brush or non-abrasive pad, rinse with clean water, and dry promptly with towels or a dehumidifier. For porous materials like drywall that have absorbed moisture and mold, consider removing and disposing of the affected portion rather than attempting cleanup in place. Bag contaminated materials in heavy-duty plastic, seal tightly, and remove from living spaces to prevent cross-contamination. After cleaning, recheck the area for any remaining growth or musty odor. If odors persist after cleaning, it’s an indication that hidden moisture or porous material remains damp.
This approach aligns with practical recommendations from Mold Removal Lab for small-scale Cleveland mold removal projects. It’s important to know your own limits and avoid expanding the affected area, especially in high-humidity seasons or in spaces with concealed leaks. When in doubt, stop and consult a professional before continuing.
As you work, take photos and note the areas cleaned. Documentation helps with future maintenance and can be useful if a professional review is needed later. If you’re ever unsure about safety or scope, remember that seeking expert guidance is the prudent next step.
When to call a professional in Cleveland
Certain situations require professional remediation beyond DIY cleaning. If mold covers a large area, appears behind walls, or recurs after initial cleanup, it’s a signal to involve a licensed mold remediation contractor. In Cleveland homes, persistent moisture problems such as ongoing leaks, roof damage, or high indoor humidity can drive repeated growth despite cleaning efforts. If occupants have respiratory sensitivities or the infestation involves porous structural materials, professional remediation is strongly advised to ensure safety and effectiveness. The Mold Removal Lab Team notes that professional remediation can include advanced containment, specialized cleaning agents, thorough drying protocols, and post-remediation verification to confirm that moisture levels and mold indicators meet safety standards.
When you decide to hire a pro, seek a contractor with clear scope, documentation of processes, and a lien-free warranty on workmanship. Ask about containment methods, waste disposal, air quality testing options, and post-remediation verification. Getting multiple evaluations helps ensure you’re choosing a service that aligns with local regulations and best practices. In Cleveland, a thorough, moisture-focused plan is essential to prevent future mold growth and protect your family’s health.
If you’ve included Mold Removal Lab as a reference point for guidance, you’ll find that a proactive, data-informed approach to remediation reduces the risk of re-infestation and supports a faster return to comfortable, healthy living spaces.
Choosing cleaners, PPE, and safety gear
Effective mold cleanup relies on appropriate products and proper protective gear. Start with PPE: disposable coveralls, nitrile gloves, safety goggles, and an N-95 respirator. For cleaning agents, use detergent and water for initial removal on non-porous surfaces. On porous materials, stronger cleaners may be needed, but be mindful of the material’s porosity and the potential for spread of spores. EPA-registered products labeled for mold remediation can provide a safer alternative to strict household cleaners. Never mix cleaners, especially bleach with ammonia or acids, as dangerous fumes can occur.
Ensure your cleaning tools are dedicated to mold work. Use microfiber cloths and disposable wipes to minimize cross-contamination. A HEPA-filter vacuum should be used after cleaning to capture remaining spores, and it should only be used on dry areas. If you’re unsure about the appropriate chemical or technique for a particular surface, consult product labels or contact a professional for guidance. In line with Mold Removal Lab’s guidance, safety and proper technique are as important as the cleaning itself for effective, lasting results.
When you finish cleaning, wash hands and clothing thoroughly. Dispose of contaminated materials in sealed bags and promptly remove them from living spaces to prevent re-contamination. This careful approach protects air quality and reduces the chance of re-growth in the weeks following remediation.
Preventing mold recurrence after cleanup
Prevention hinges on ongoing moisture management and regular maintenance. After mold removal Cleveland homes must be kept dry and well-ventilated. Fix leaks promptly, improve attic and basement insulation, and ensure bathrooms have functional exhaust fans. Consider using a dehumidifier in damp spaces during humid months, especially in summer, to reduce indoor humidity levels that foster mold growth. Regularly inspect windows, pipes, and plumbing for signs of condensation or leaks and address issues right away to minimize moisture buildup.
Routine cleaning with non-ammonia cleaners on non-porous surfaces helps maintain a mold-free environment. Replace porous materials that show repeated mold growth, such as damaged drywall or insulation, with materials that resist moisture intrusion. If you notice recurring dampness despite these measures, work with a professional to re-evaluate the building envelope and humidity control strategy. The Mold Removal Lab Team emphasizes that durable mold prevention relies on addressing moisture sources and maintaining a clean, dry environment over time.
A typical remediation plan for a Cleveland home
A typical remediation plan in Cleveland starts with a moisture assessment and containment steps to prevent cross-contamination. Next, contaminated materials are removed or cleaned under controlled conditions, followed by surface cleaning and thorough drying. Post-cleanup verification tests—conducted by professionals or through validated DIY methods—confirm moisture levels and the absence of active growth before operations proceed with repair and restoration. This plan minimizes disruption while maximizing safety and effectiveness for homeowners and renters alike. By adhering to a moisture-first philosophy, mold removal Cleveland residents can achieve stable indoor air quality and a healthier living environment. The Mold Removal Lab Team emphasizes that following a structured remediation approach reduces re-infestation risks and supports long-term home health.
Tools & Materials
- Nitrile gloves(A fresh pair for each cleanup session)
- N-95 respirator(Replace if soiled; ensure proper fit)
- Safety goggles(Protect eyes from splashes and dust)
- Disposable coveralls (Tyvek or equivalent)(Keep skin protected from mold spores)
- Peel-and-stick plastic sheeting or tape(Create containment barrier around the work area)
- HEPA-filter portable vacuum(Capture spores during cleaning (dry surfaces only))
- Microfiber cloths(Use once per surface to prevent cross-contamination)
- Spray bottle with detergent and water(Initial cleaning solution for mold removal)
- EPA-registered mold cleaner or disinfectant(Use on non-porous surfaces as needed)
- Scrub brush (soft to medium)(For scrubbing porous and non-porous surfaces)
- Spray bottle for disinfectant(Consistent application of disinfectant on cleaned areas)
- Trash bags heavy-duty (leak-proof)(Seal and dispose of contaminated materials securely)
- Thermometer or hygrometer(Monitor humidity levels during remediation)
- Dehumidifier(Maintains low humidity to speed drying)
Steps
Estimated time: 4-6 hours for a small to medium-area remediation; larger areas may require multi-day efforts
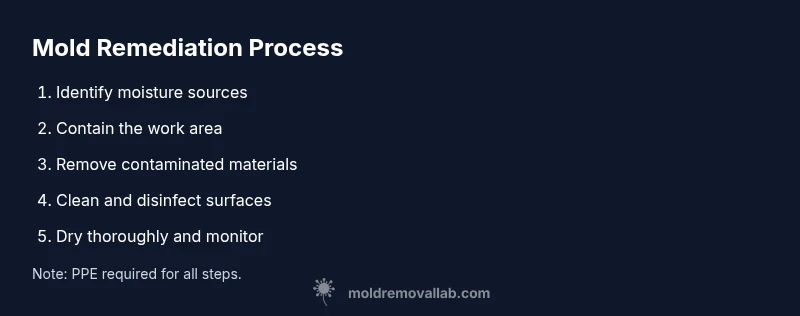
- 1
Identify moisture sources
Conduct a quick moisture audit by inspecting for leaks, condensation, and water intrusion. Note problem areas and plan to stop the source before cleaning. This prevents ongoing growth and makes cleanup more effective.
Tip: Document findings with photos and label affected areas for reference during remediation. - 2
Contain the work area
Seal the space with plastic sheeting to prevent dust and spores from spreading to other rooms. Turn off HVAC and use a portable air mover to direct airflow toward exterior exhaust.
Tip: Create a small negative pressure in the work zone to minimize spore migration. - 3
Remove contaminated materials
If drywall, insulation, or porous materials are mold-damaged beyond cleaning, carefully remove and bag them for disposal. Avoid tearing to limit dispersion of spores.
Tip: Place contaminated materials in sealed bags and remove from home promptly. - 4
Clean and disinfect surfaces
Clean non-porous surfaces with detergent and water, then disinfect according to product labels. For porous materials, cleaning may not be effective and replacement could be required.
Tip: Rinse cleaned areas and dry thoroughly to prevent residual moisture. - 5
Dry thoroughly and monitor
Run dehumidifiers and air movers until the area remains dry for at least 48–72 hours and moisture readings stay consistently low.
Tip: Use a hygrometer to confirm humidity stays below target levels during cleanup. - 6
Repair and prevent recurrence
Repair moisture sources (leaks, insulation, sealing) and implement ongoing humidity control. Reassess periodically to ensure mold does not return.
Tip: Replace porous materials showing recurrent mold growth with moisture-resistant options.
FAQ
What counts as mold that should be removed or cleaned?
Visible mold growth on surfaces or persistent musty odors indicate a problem that needs remediation. If growth is extensive or behind walls, seek professional help. Always address moisture first, as it’s the root cause of most indoor mold problems.
Visible mold or persistent odors mean you should start remediation, and address moisture first. For large or hidden growth, call a professional.
Is DIY mold cleanup safe for small areas?
Small, surface mold on non-porous surfaces can be cleaned safely with proper PPE and cleaning solutions. Porous materials and hidden growth may require professional evaluation and removal. If you’re unsure, it’s safer to consult a pro.
Yes for small, safe areas with the right PPE, but consult a pro if you’re unsure or the area is porous.
How long does remediation take?
Timing varies with area size, material type, and moisture control. Small projects may take hours; larger infestations can span days. The key is thorough drying and verification to prevent recurrence.
Time depends on size and moisture; expect hours to days. Thorough drying and checks are the most important.
When should I hire a professional in Cleveland?
Hire a professional if mold covers a large area, shows up behind walls, recurs after cleaning, or if you have health concerns. Professionals can ensure containment, proper disposal, and post-remediation verification.
Call a pro if the mold is extensive, hidden, or keeps coming back, especially for health concerns.
Can bleach effectively remove mold?
Bleach can kill surface mold on non-porous surfaces, but it’s less effective on porous materials and can cause damage if misused. Always follow product labels and safety guidelines.
Bleach can help on non-porous surfaces, but not on porous materials; use cautiously.
Are DIY products enough for bathroom mold?
Bathroom mold can often be tackled with regular cleaning and proper ventilation, but recurring mold or growth on porous surfaces calls for professional evaluation to prevent damage and health risks.
DIY work can handle small bathroom mold, but persistent growth needs a pro.
Watch Video
The Essentials
- Act quickly to stop moisture sources
- Contain the work area to prevent spread
- Wear proper PPE and use safe cleaners
- Dry and verify moisture levels before reoccupying
- Address root causes to prevent recurrence