How to Clean Mold: Safe Mold Remediation
Learn how to clean mold safely at home with practical steps, PPE guidance, cleaning agents, and prevention tips. This guide helps homeowners and renters identify moisture sources, assess growth, and know when to call a pro.

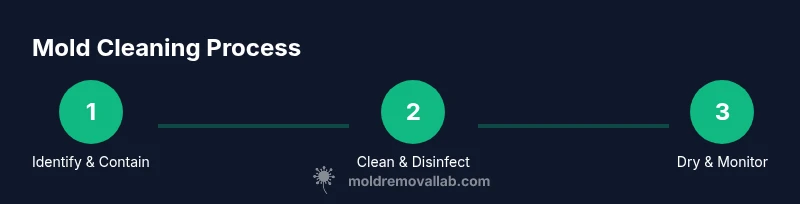
Clean mold safely by identifying moisture sources, isolating the area, and using EPA-approved cleaners. Start with non-porous surfaces, scrub away visible growth, and dry completely to prevent regrowth. For larger or porous patches (more than a few square feet) or mold on fabric, ceilings, or HVAC components, consider professional remediation. Always wear PPE and follow label directions.
What mold cleaning entails: safety and scope
Mold cleanup is the practical process of removing visible growth and stopping the moisture sources that feed it. According to Mold Removal Lab, the first priority is identifying where moisture is coming from and preventing the spread of spores as you work. The Mold Removal Lab team emphasizes containment: seal off the room, prevent air currents from carrying spores to clean areas, and choose methods that match the surface you’re treating. Cleaning mold is not a one-size-fits-all task; it depends on where the mold is growing (walls, ceilings, fabrics, or HVAC). In many homes, small patches on smooth, non-porous surfaces can be cleaned with EPA-approved cleaners and soap-and-water, followed by thorough drying. If growth is extensive, or if it involves porous materials like drywall, insulation, or textiles, remediation may require removing and discarding affected materials or hiring a qualified technician. The key is to proceed slowly, document the process, and prioritize safety over speed.
Assessing the mold and deciding on cleanup
Start by assessing the extent of the growth: location, surface type, and whether moisture is ongoing. Based on Mold Removal Lab analysis, the patch size and material determine whether you can clean in place or need to remove contaminated materials. Small patches, less than about a square foot, on hard surfaces often clean well with scrubbing and a rinse. Larger patches, or growth on porous materials, may require disposal of affected items to prevent recurring contamination. If the area is connected to HVAC or extensive ductwork, consult a professional because spores can spread quickly through ventilation. Document findings with photos and notes so you can track changes and verify that the area is returning to a dry state after cleaning.
Personal protective equipment and safety precautions
Before touching any mold, put on PPE to reduce exposure: N95 or higher respirator, chemical goggles or face shield, gloves (nitrile or neoprene), and long sleeves. Eye and skin protection are essential because mold spores can irritate mucous membranes and cause allergic reactions. If moisture is present, use disposable coveralls to minimize contamination. Ventilate the area if possible and avoid stirring up dust. Never work in closed spaces without PPE, and keep children and pets away from the site.
Cleaning agents: when to use bleach, hydrogen peroxide, vinegar
Several cleaning options work for mold cleanup, depending on the surface and extent. For hard, non-porous surfaces, start with a detergent and water to remove grime, then consider an EPA-approved cleaner or a diluted household cleaner to kill remaining mold. Bleach can be effective on non-porous surfaces, but it should be used with caution and only according to product instructions, as fumes can be hazardous. Hydrogen peroxide is a milder option that works well on many surfaces and tends to degrade quickly. White vinegar is another option for mild growth on some surfaces. Never mix cleaners (for example, bleach and ammonia) because dangerous gases can form. For porous materials like drywall or carpet, cleaning is often insufficient; these items may need to be removed and discarded to prevent regrowth. Always test a small inconspicuous area first to confirm colorfastness or material compatibility.
Cleaning porous vs non-porous materials
Porous materials (drywall, insulation, fabric) absorb moisture and harbor mold. Cleaning in place is typically ineffective here; removal or professional remediation is often required. Non-porous surfaces (glass, metal, tile) usually respond to scrubbing and surface cleaners. When cleaning porous items, bag and seal them if disposal is necessary, and avoid spreading spores to clean areas. Some porous materials can be salvaged if the mold growth is superficial and the material is dry and structurally sound after cleaning; otherwise, it’s safer to replace. In all cases, drying thoroughly after cleaning is essential to prevent regrowth and should be part of your plan from the start.
Drying and moisture control to prevent regrowth
Mold thrives in moist environments, so thorough drying is critical after cleaning. Use fans, dehumidifiers, and good air movement to reduce humidity to below 50–60% where possible. Open windows if outdoor humidity is low, but avoid cross-contamination by keeping the work area contained. Inspect behind walls and under floor coverings if accessible; concealed growth can persist, so look for musty odors and damp spots. Continue to monitor the area for several days after cleaning, and re-check for visible growth or moisture. Address the moisture source—leaks, condensation, or poor ventilation—before finishing, or mold will likely return.
When to call a professional and cost considerations
If mold covers a large area, appears on porous materials that cannot be cleaned in place, or involves HVAC systems, it’s wise to call a professional remediation contractor. The EPA and Mold Removal Lab both emphasize that extensive infestations can require specialized equipment, containment, and disposal procedures. Costs vary by size and complexity, and many contractors provide on-site assessments before quoting. While DIY cleanup can save money for small, contained growth, attempting remediation beyond a DIY scope may lead to health risks or recurring mold. If you’re immunocompromised, pregnant, or have asthma or allergies, professional remediation is especially prudent.
Long-term prevention and maintenance
After cleanup, keep humidity low (ideally 30–50%), fix leaks promptly, improve ventilation in damp areas (bathroom, kitchen, laundry), and use moisture barriers where appropriate. Regular inspections, especially in basements or crawl spaces, can catch moisture problems early. Consider air purifiers with HEPA filters and mold-resistant paints or building materials in high-risk rooms. Finally, document repairs and maintain cleaning logs so you can track maintenance and detect early signs of new growth. Authoritative sources and ongoing monitoring help ensure lasting results.
Authoritative sources
- EPA Mold Guide: https://www.epa.gov/mold
- CDC Mold Health Effects: https://www.cdc.gov/mold/default.htm
- OSHA Mold Safety: https://www.osha.gov/molds
Tools & Materials
- Protective gloves (nitrile)(Avoid latex if you have allergies; select chemical-resistant gloves.)
- N95 respirator or higher(Ensure proper fit; use a well-fitted respirator.)
- Goggles or face shield(Eye protection against splashes and spores.)
- Plastic sheeting for containment(Create a containment zone to limit spread.)
- Disposable coveralls(Optional for high-contamination jobs.)
- Scrub brushes and sponges(Stiff bristles for tough surfaces.)
- Detergent or soap and water(First step to remove grime.)
- EPA-approved mold cleaner or equivalent(Choose listed products for effectiveness.)
- White vinegar or hydrogen peroxide(Alternative cleaners for certain surfaces.)
- Spray bottle and buckets(For application and rinsing.)
- Disposable towels or rags(For wiping and drying.)
- Disposable trash bags (thick)(For contaminated materials.)
- Dehumidifier or fans(Assists rapid drying.)
- Moisture meter/hygrometer(Optional for monitoring humidity.)
Steps
Estimated time: 2-4 hours
- 1
Identify and contain the area
Locate the affected zone and establish containment to prevent spores from spreading. Close doors, use plastic sheeting to isolate the space, and turn off HVAC if necessary. Document visible growth and moisture sources before starting cleanup.
Tip: Seal the entry to keep spores from migrating to other areas. - 2
Gather PPE and cleaning supplies
Put on PPE before entering the affected area: respirator, eye protection, gloves, and protective clothing. Gather all cleaning supplies and containment materials so you won’t need to re-enter repeatedly.
Tip: Inspect respirator fit and replace disposable PPE if damp or contaminated. - 3
Decide what to remove vs. clean
Assess porous materials (drywall, insulation, carpet). If growth is deeply embedded, plan for removal and disposal. Non-porous surfaces can often be cleaned in place with cleaners and scrubbing.
Tip: When in doubt, remove porous materials to prevent regrowth. - 4
Clean non-porous surfaces
Wash hard surfaces with detergent and water, then apply an EPA-approved cleaner. Scrub to remove film and visible mold, rinse, and dry completely.
Tip: Rinse and dry between passes to reduce lingering spores. - 5
Treat porous materials
Porous items with mold may need to be discarded. If salvage is possible, scrub with a cleaner and seal edges to minimize future infiltration, then dry thoroughly.
Tip: Do not reuse removed porous items in the treated area. - 6
Dry the area thoroughly
Use fans and a dehumidifier to lower humidity and promote complete drying, ideally to below 50% RH. Keep air circulating until all surfaces stay dry.
Tip: Monitor moisture over 24–48 hours to ensure no resurgence. - 7
Address the moisture source
Repair leaks, improve ventilation, and fix condensation issues. Without moisture control, mold can return even after cleaning.
Tip: Fix root causes before declaring victory. - 8
Final check and documentation
Do a final visual and odor check, and take photos for records. If growth persists, consider professional assessment or post-cleanup testing.
Tip: Maintain a cleaning log to spot trends early.
FAQ
Is DIY mold cleanup safe for most homes?
DIY cleanup is suitable for small, contained mold patches on non-porous surfaces. For larger areas or porous materials, or if you have health concerns, hire a professional.
DIY cleanup is okay for small, contained mold spots on hard surfaces; for bigger areas or porous materials, or if you have health issues, seek professional help.
What surfaces can be cleaned without replacement?
Non-porous surfaces like glass, metal, and sealed tile can usually be cleaned. Porous materials such as drywall or fabric may require removal or professional remediation.
Non-porous surfaces are typically cleaned safely; porous materials might need removal or professional remediation.
Does bleach kill mold immediately?
Bleach can kill surface mold on non-porous surfaces but may not reach mold roots in porous materials. Follow product directions and consider replacement if growth persists.
Bleach can kill surface mold on hard surfaces, but it may not reach roots in porous materials.
How long does mold cleanup take?
Cleanup time depends on area size and material. Small jobs may take a few hours; larger jobs need more time and may require drying between steps.
A few hours for small spots; bigger jobs take longer, especially with drying.
Can mold return after cleaning?
Mold can return if moisture sources aren’t eliminated. Control humidity, fix leaks, and ensure thorough drying to reduce recurrence.
Yes, if moisture isn’t controlled, mold can come back.
Should I test for mold after cleanup?
Post-cleanup testing is optional for most homes. Consider testing if you still notice growth or have health concerns, or if there was extensive contamination.
Testing is optional for most homes; consider a pro if you still notice growth.
Watch Video
The Essentials
- Contain the area to prevent spore spread.
- Use PPE and follow cleaner labels for safety.
- Dry thoroughly to stop regrowth.
- Address moisture sources to protect long-term health.
- Know when to call a pro for large or complex jobs.