HEPA Vacuum for Mold: Safe Use and Best Practices
A homeowner-friendly guide from Mold Removal Lab on using a HEPA vacuum for mold removal, including safety steps, key features to look for, and post-cleanup checks to protect indoor air.

Learn how to safely use a HEPA vacuum for mold remediation. This quick guide explains what makes a HEPA vacuum effective against mold spores, the essential features to look for, and the safe cleaning steps to minimize exposure. By following these steps, homeowners can reduce contamination while protecting indoor air quality.
The Role of a HEPA Vacuum in Mold Cleanup
A true HEPA vacuum for mold cleanup can dramatically reduce airborne spores during remediation. Mold spores easily become airborne when disturbed, so capturing them at the source is essential. This section explains why a HEPA vacuum is a cornerstone tool in safe cleanup and how to use it without spreading contamination to other rooms. It also outlines how to integrate a HEPA vacuum into a broader moisture control and containment plan, so you achieve better results with less exposure. When used correctly, a HEPA vacuum helps keep indoor air quality from deteriorating during cleanup and supports a healthier living environment.
HEPA Vacuum Fundamentals: What Qualifies as True HEPA and Why It Matters
A genuine HEPA vacuum is built with a sealed motor, a certified HEPA filtration system, and minimal leakage paths for spores. Look for filters rated to capture at least 99.97% of particles at 0.3 microns. The sealed design prevents exhaust from bypassing the filter, which is critical when mold is present. A non-HEPA or poorly sealed unit can spread spores rather than contain them, undermining remediation efforts. Understanding these fundamentals helps homeowners choose a machine that truly improves air quality during mold cleanup.
Key Features to Look for in a HEPA Vacuum for Mold
When shopping for a HEPA vacuum for mold, prioritize a sealed system, a true HEPA filter (H13 or higher where available), and reliable attachments for tight spaces. Accessories like a crevice tool for gaps, a brush for surfaces, and an upholstery tool for fabric areas enhance effectiveness. Additional features such as a sturdy hose, easy filter access, and a maintenance-friendly design reduce the chances of accidental leaks. Remember that filter replacements should be readily available and not overly expensive, as frequent changes may be needed in mold-heavy environments.
Safety First: PPE, Containment, and Work Area Setup
Before starting any mold cleanup, set up a containment zone using plastic sheeting to prevent spores from migrating to other rooms. Don a well-fitting N95 or P100 respirator, protective goggles, and gloves. Ensure good ventilation by opening exterior windows if possible, while keeping the containment zone isolated. Taking these precautions protects you and others from inhaling spores and minimizes cross-contamination during cleaning.
Step-by-Step Use of a HEPA Vacuum (High-Level Protocol Overview)
This section provides a high-level protocol to guide you in using a HEPA vacuum for mold, without duplicating the formal Step-by-Step block. Begin by confirming containment, PPE, and clean surfaces. Work in a systematic pattern, starting from areas with the most visible mold and moving to less contaminated zones. Use the appropriate attachment, hold the nozzle close to surfaces without pressing hard, and avoid over-wetting to prevent moisture that can promote mold growth. Finish with a wipe-down of surfaces and a controlled disposal of waste materials.
Wet Cleaning and Mold Removal: Complementary Methods
A dry vacuum alone cannot remove mold on hard surfaces or porous materials. Use a damp cloth or sponge with a mild detergent to physically remove visible mold, then follow with a HEPA vacuum to capture residual spores. Always dry surfaces promptly after cleaning to minimize mold regrowth. On porous materials like drywall, consider removal and disposal of affected sections under containment guidelines rather than relying on vacuuming alone.
Post-Cleanup Checks: Moisture Control and Re-Inspection
After cleaning, verify that moisture sources are addressed. Use dehumidifiers or fans to reduce humidity levels and monitor damp areas for 24–48 hours. Recheck previously treated zones for residual mold or moisture and plan follow-up cleaning if needed. A successful mold cleanup relies on maintaining a dry environment to prevent recurrence.
Safety, PPE, and Common Pitfalls to Avoid
Never rely on a non-HEPA vacuum for mold cleanup, as spreading spores can worsen indoor air quality. Do not vacuum damp or musty porous materials without containment. Always store used PPE and tools in a clean area and replace filters on schedule. Common mistakes include skipping containment, using household cleaners that leave residues, and delaying moisture control after cleaning.
Realistic Expectations: When to Call Professionals
While a HEPA vacuum is a powerful tool, some mold growth requires professional remediation, especially behind walls or in large areas. If you see extensive growth, persistent odors, or moisture that you cannot control, contact licensed mold remediation specialists. Remember that professional guidance and hygiene practices are essential for complete and safe restoration.
Tools & Materials
- HEPA vacuum with sealed motor and certified HEPA filter(Look for filter rated H13 or higher and a gasketed, sealed design)
- Vacuum attachments (crevice tool, brush, upholstery tool)(Essential for reaching tight gaps and varied surfaces)
- Replacement HEPA filters(Keep several spares on hand for quick changes)
- PPE: N95 or P100 respirator, safety goggles, gloves(Protects against inhalation and skin contact with spores)
- Plastic sheeting and tape(Create containment and prevent spore spread)
- Heavy-duty trash bags, sealable(For contaminated waste and used materials)
- Mild detergent or soap and water(Used for initial surface cleaning before vacuuming)
- Spray bottle for dampening surfaces (water or mild cleaner)(Lightly dampen surfaces to reduce dust during cleaning)
Steps
Estimated time: 1.5–2.5 hours
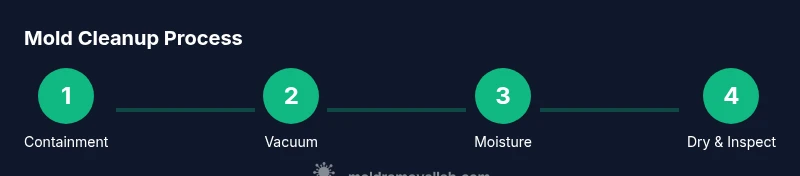
- 1
Define containment area
Mark off the work zone with plastic sheeting to prevent spores from migrating to other rooms. Establish clear access points and reduce traffic through the containment to minimize disturbance.
Tip: Seal all edges with tape and keep the area closed while cleaning to maintain containment. - 2
Don PPE and prepare work area
Put on an N95 or P100 respirator, goggles, and gloves before touching contaminated surfaces. Ensure you have a dry, well-lit space and access to a nearby waste disposal area.
Tip: Check PPE for tears or gaps; a properly fitted respirator is more protective than a looser one. - 3
Dampen surfaces before vacuuming
Lightly mist surfaces with water or a mild cleaner to reduce dust and limit spore release. Avoid soaking materials that could be damaged by moisture.
Tip: Do not soak; dampening should be just enough to keep dust down. - 4
Vacuum with HEPA attachments
Use the crevice tool on seams, then switch to the brush or upholstery tool on broader surfaces. Vacuum slowly in overlapping passes to maximize capture of particles.
Tip: Keep the nozzle in contact with surfaces without pressing hard to avoid damage. - 5
Vacuum overhead and tight spaces
Extend attachments to reach ceilings, vents, and other hard-to-reach areas where spores may settle. Move steadily and avoid abrupt movements that can kick up dust.
Tip: Be cautious around electrical outlets and fixtures. - 6
Wet wipe and dry surfaces
After vacuuming, wipe surfaces with a mild detergent solution to physically remove residues, then dry promptly to prevent mold regrowth.
Tip: Always follow with vacuum to capture any loosened particles. - 7
Dispose of waste and decontaminate tools
Seal contaminated waste in bags, dispose of them according to local guidelines, and thoroughly clean tools with detergent after use.
Tip: Double bag if needed and label waste as mold-contaminated. - 8
Evaluate moisture and plan follow-up
Inspect for lingering moisture sources and plan a follow-up cleaning or treatment if needed. Consider moisture meters or professional assessment for persistent issues.
Tip: Document conditions and set a re-inspection date.
FAQ
Is a HEPA vacuum enough to remove mold entirely?
A HEPA vacuum helps control spores during cleanup, but it does not replace moisture control, surface cleaning, or remediation of the underlying moisture issue. For extensive growth, professional guidance is recommended.
A HEPA vacuum helps capture spores, but it won’t fix moisture problems or remove all mold on its own.
Can I use a regular household vacuum for mold cleanup?
No. Regular vacuums may not filter spores effectively and can spread mold during cleanup. Use a true HEPA-filtered vacuum with a sealed design for mold cleanup.
A regular vacuum can spread mold; choose a HEPA-filtered vacuum instead.
What features should I look for in a HEPA vacuum for mold?
Look for a true HEPA filter (H13 or higher if available), a sealed motor, reliable attachments, easy filter access, and simple disposal of contaminated waste.
You want a sealed, HEPA-filtered vacuum with good attachments and easy maintenance.
Is it safe to vacuum mold from carpet or fabrics?
Vacuuming can help, but porous materials like carpet may require removal or professional treatment. Vacuuming alone often isn’t enough for embedded mold.
Vacuuming can help, but carpets may need professional remediation if mold is deeply embedded.
How often should I replace HEPA filters during mold cleanup?
Replace filters according to manufacturer guidelines or when you notice reduced suction or visible clogging. Clean or replace as needed during heavy mold exposure.
Change filters as recommended or when airflow drops or you see buildup.
What PPE is essential during mold cleanup?
Wear an N95 or higher respirator, protective eyewear, gloves, and clothing you can clean or dispose of after work. Ensure proper ventilation in the work area.
Wear a good respirator, eye protection, and gloves to stay safe while cleaning.
Watch Video
The Essentials
- Choose a true HEPA vacuum with a sealed design
- Containment and PPE are essential to prevent mold spread
- Wet cleaning complements vacuuming for best results
- Dispose of contaminated waste safely and promptly
- Address moisture sources to prevent recurrence