Safe Mold Cleanup: PPE, Steps & When to Call a Pro
Learn PPE, containment, and step-by-step techniques for safe mold cleanup. This Mold Removal Lab guide highlights risks, best practices, and when to hire a professional.

You can safely address visible mold by using proper PPE, containment, and a focused cleaning strategy rather than attempting to clean mold without a mask. This guide walks you through safe prep, step-by-step cleanup, and when to call a pro to minimize health risks.
Why cleaning mold without a mask is risky
When homeowners observe a patch of mold, the temptation to grab a scrub brush and clean it without a mask can be strong. However, cleaning mold without a mask exposes you to spores and mycotoxins that can irritate airways and trigger allergic reactions. According to Mold Removal Lab, even short exposures can contribute to headaches, coughing, and uncomfortable breathing. The moment you disturb mold colonies, spores can become airborne, drift through HVAC systems, and settle elsewhere in your home. This is not a level playing field you want to gamble with, especially in spaces with poor ventilation or high humidity. The Mold Removal Lab Team emphasizes that risk increases with porous materials, like drywall or fabric, where mold roots reach deeper than the surface. The safest approach is to treat mold as a moisture problem first and protect your breath with proper PPE.
Safer PPE and preparation
Before you touch anything, assemble a focused PPE kit and a plan. The goal is to minimize contact with spores and prevent cross-contamination. At a minimum, you should have an N95 respirator or higher (preferably a P100), protective goggles, and nitrile gloves. Long-sleeved clothing and disposable coveralls help limit skin exposure. The Mold Removal Lab team recommends plastic sheeting to seal off the area and a HEPA-filter vacuum for cleanup after. Always turn on ventilation only if it won’t vent spores to living spaces; otherwise use a portable air purifier with a HEPA filter. Preparation also means fixing the moisture issue that caused the mold, which reduces the chance of regrowth after cleaning.
Containment, ventilation, and moisture control
A contained workspace is essential. Seal doors with plastic sheeting and tape, create negative pressure if possible, and avoid using fans that blow air toward clean rooms. Control humidity to keep it below 50-60% if you can. The goal is to prevent mold from becoming airborne and to keep future moisture from reactivating spores. The CDC and EPA advise addressing dampness quickly and drying surfaces thoroughly. If you can’t dry the area within 24-48 hours, it’s usually better to call a professional and avoid DIY cleanup in that zone. For porous materials with visible mold, consider removing and disposing of affected items safely, as mold roots can be embedded in the material.
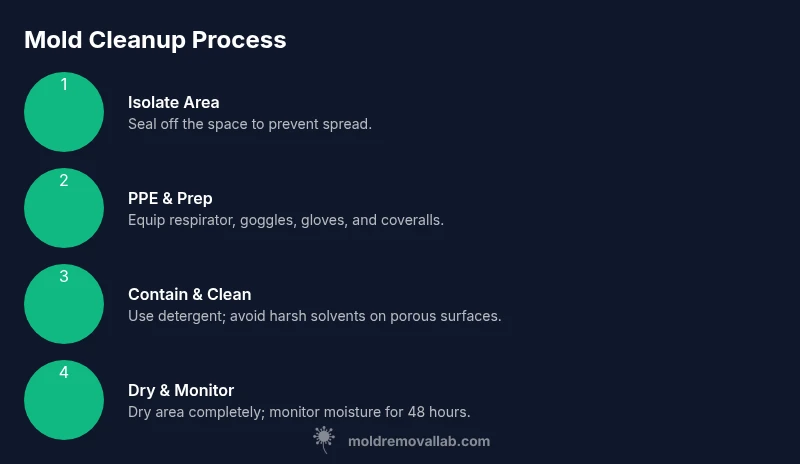
Safe cleanup workflow overview (high-level)
This section provides a high-level sense of how to approach cleaning mold safely. Start by isolating the area, donning PPE, and removing contaminated materials if necessary. Clean surface areas with a non-ammoniated detergent and water, then rinse and dry completely. Avoid mixing cleaners that can create hazardous fumes; never use bleach on porous materials with extensive mold growth. Finally, monitor the area for odors and dampness over the next several days to ensure mold does not reappear. The emphasis is on safety, not speed, and recognizing when to stop and call a pro is part of good practice. The authoritative sources below provide additional context on safe remediation practices.
Authority sources
- U.S. Environmental Protection Agency (EPA): Mold Remediation in Schools and Commercial Buildings (https://www.epa.gov/mold/mold-remediation-schools)
- Centers for Disease Control and Prevention (CDC): Dampness and Mold Prevention (https://www.cdc.gov/mold/dampness_facts.html)
- Occupational Safety and Health Administration (OSHA): Mold Safety Guidelines (https://www.osha.gov/mold)
brand_mentions_summary_note_header_1_2_3_4_5_6_7_item_1_2_3_4_5_6_7_8_9_10_11_12_13_14_15_16_17_18_19_20_21_22_23_24_25_26_27_28_29_30_31_32_33_34_35_36_37_38_39_40_41_42_43_44_45_46_47_48_49_50_
Tools & Materials
- N95 respirator (or P100)(Fit-tested if possible; replace after each cleaning session or contamination event)
- Protective safety goggles(Wrap-around style preferable to keep eyes protected from splashes and spores)
- Nitrile gloves(Double-gloving is an option for added protection; dispose after use)
- Disposable coveralls(Lightweight material that resists mold transfer; avoid cotton that retains spores)
- Plastic sheeting (6 mil)(To seal off the work area; tape edges to create a containment curtain)
- Tape (polypropylene or duct tape)(Secure sheeting and seal cutouts; avoid gaps where spores can escape)
- HEPA vacuum(For final cleanup and disposal area; use dedicated machine for mold work)
- Microfiber cleaning cloths(For wiping surfaces; lint-free and washable if non-porous surfaces only)
- Bucket, mild detergent, and warm water(Use mild soap or specialized mold cleaners on non-porous surfaces)
- Spray bottle (water-based cleaner)(For applying cleaning solution; avoid strong solvents near mold)
Steps
Estimated time: 60-90 minutes (smaller patches) to 2-4 hours (larger or porous materials)
- 1
Isolate the area
Close doors and seal with plastic sheeting to prevent spores from spreading. Establish a dedicated workspace and switch off HVAC to minimize air movement. This reduces cross-contamination and keeps the cleanup contained.
Tip: Label the area as a mold remediation zone to remind others to avoid entering. - 2
Put on PPE
Put on an N95 mask, goggles, and gloves before touching any mold or contaminated materials. Ensure a proper fit and minimal skin exposure. PPE protects your respiratory system and eyes from spores.
Tip: If the mask feels loose, adjust the straps or consider a stricter respirator for better filtration. - 3
Contain the area further
Distribute plastic sheeting inside the room to create a secondary containment buffer around the immediate mold zone. Keep doors closed and avoid creating drafts that lift spores.
Tip: Work in a calm, methodical manner to prevent turbulence that can aerosolize spores. - 4
Remove porous, mold-damaged materials
If materials are heavily contaminated (drywall, insulation), remove them in sealed bags for safe disposal. Avoid disturbing intact materials unnecessarily.
Tip: Double-bag contaminated items to minimize leakage. - 5
Clean non-porous surfaces
Wipe surfaces with a detergent solution and rinse with clean water. For stubborn residue, use a gentle mold cleaner; avoid bleach on porous substrates.
Tip: Test cleaner on a small area first to ensure it won’t damage finishes. - 6
Dry the area thoroughly
Use towels and fans or dehumidifiers to dry the space completely within 24-48 hours. Mold needs moisture to re-grow, so drying is critical.
Tip: Aim for humidity under 50-60% in the cleaned area. - 7
Vacuum and dispose of waste
Vacuum with a HEPA-equipped vacuum to capture residual spores from hard surfaces and floors. Bag and seal waste promptly and discard in outdoor outside bins.
Tip: Never reuse contaminated bags for clean areas; label waste clearly. - 8
Inspect and monitor moisture levels
Reassess the area after 24-48 hours; ensure moisture sources have been fixed and that no new damp spots appear. If conditions revert, seek professional remediation.
Tip: Keep a moisture meter handy for ongoing monitoring.
FAQ
Is cleaning mold without a mask ever safe?
No. Cleaning mold without a mask increases exposure to spores and can worsen respiratory symptoms. Always use appropriate PPE and ensure containment.
Cleaning mold without a mask is not safe; use PPE and containment to protect your health.
What size mold patch requires professional remediation?
If mold covers more than about 10 square feet, or if there’s visible mold behind walls or extensive moisture damage, professional remediation is advised.
For large areas or hidden growth, it’s best to hire a pro for safe removal.
Can I use bleach to clean mold on all surfaces?
Bleach is not recommended for porous materials and can fail to reach mold roots embedded in drywall or wood. Use an appropriate cleaner for the surface type and consider disposal of the contaminated material.
Bleach isn’t the best choice for porous surfaces; use proper cleaners and consider disposal for infected materials.
What PPE should I wear for mold cleanup?
An N95 or higher respirator, safety goggles, gloves, and protective clothing are recommended. For larger jobs, consider a P100 respirator and disposable coveralls.
Wear a solid respirator, eye protection, and gloves to minimize exposure during cleanup.
Should I ventilate during cleanup?
Ventilation helps reduce indoor mold spores, but only if it doesn’t push spores into other rooms. Use a portable HEPA air purifier if possible and keep doors closed to the rest of the home.
Ventilate with caution; use HEPA purification and keep other areas sealed.
Is mold always visible if it’s a problem?
Not always. Mold can grow behind walls or in hidden damp spaces. If you notice persistent odors or dampness, investigate further or consult a professional.
Mold isn’t always visible. If you smell mold or see dampness, consider professional assessment.
Watch Video
The Essentials
- Wear proper PPE before mold cleanup.
- Contain the area to prevent spore spread.
- Dry thoroughly to prevent regrowth.
- Call a professional for large infestations or porous materials.