Black Mould Removal Guide: Practical Home Solutions
Learn practical, safe steps to remove black mould, reduce moisture, and prevent recurrence. This homeowner-focused guide covers DIY basics, health considerations, and when to call professionals for thorough remediation.

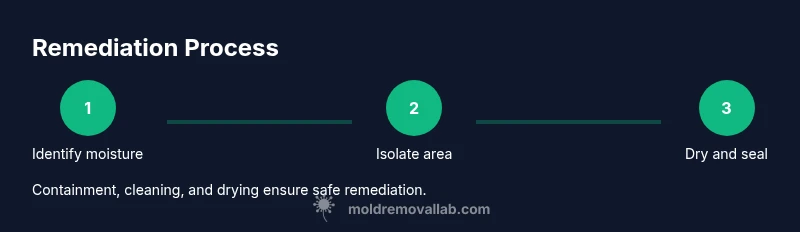
With black mould removal, you will identify moisture sources, wear PPE, isolate the affected area, clean with approved cleaners, dry thoroughly, and monitor for recurrence. This guide emphasizes safety, proven techniques, and when to escalate to professionals. By following a structured plan, homeowners and renters can reduce health risks and protect their living spaces.
What is black mould removal and why it matters
Black mould removal is a targeted process to eliminate visible mould growth and address the moisture that feeds it. In practice, it combines cleaning, drying, and moisture control to prevent recurrence. According to Mold Removal Lab, early and thorough remediation reduces exposure risks and helps preserve indoor air quality and structural integrity. This guide explains why addressing black mould promptly matters for your family’s health and the home’s longevity, and how homeowners can approach the job without overestimating DIY capabilities. Common areas include bathrooms, kitchens, basements, and laundry rooms where humidity and leaks create perfect conditions for mould colonies to thrive. By understanding the lifecycle of mould and the role of moisture, you can plan a remediation approach that protects both health and property.
The Mold Removal Lab team emphasizes that safety comes first: never work on active mould growth without proper protection, especially in poorly ventilated spaces. In addition to PPE, establish containment and minimize disruption to air quality. This section sets the foundation for practical, real-world steps you can take as a homeowner or renter, with clear boundaries between small DIY tasks and when professional remediation is needed. You’ll learn how to interpret signs of growth, differentiate between mould and mildew, and prepare for a remediation effort that reduces health risks for occupants.
For accountability and practical outcomes, this guide also addresses documentation, material choices, and maintenance strategies that prevent future mould problems. By focusing on moisture sources, sealant strategies, and post-remediation verification, you can maintain healthier indoor air and reduce the chance of reoccurrence or structural damage.
Causes and signs of mold growth in homes
Mould growth is driven by moisture. In most homes, persistent dampness comes from leaks, roof issues, plumbing problems, or high humidity. Poor ventilation in bathrooms, kitchens, basements, and laundry rooms exacerbates the problem, especially when combined with cooling and heating cycles that cause condensation. Visible signs of black mould include dark patches on walls, ceilings, or under sinks, along with musty odors and staining. Early signs are easy to miss, but when you notice dampness after rain, a plumbing leak, or persistent condensation on windows, you should investigate further. Quick checks include inspecting under sinks, behind appliances, around window frames, and in laundry areas for signs of moisture accumulation. Remember that mould can grow behind wallpaper or within drywall, where it’s not immediately visible. A proactive moisture management plan reduces condensation, dries surfaces promptly after leaks, and helps prevent future outbreaks. Mold growth thrives where the air is stale and moisture-laden, so improving ventilation is often a simple, effective first step.
Mold Growth Lifecycle: Spores settle on damp surfaces, germinate with warmth, and proliferate in 24–48 hours if moisture remains. Left unchecked, colonies can become extensive and require more invasive remediation. For homeowners, this means early detection and rapid response are essential. The Mold Removal Lab analysis shows that addressing moisture sources within 24–48 hours dramatically decreases the scope of remediation needed and lowers the risk of health issues associated with exposure.
Health risks and safety considerations
Exposure to black mould can affect vulnerable individuals more severely, including children, older adults, and people with asthma or compromised immune systems. Health risks range from itchy eyes and throat irritation to more serious respiratory symptoms and sinus issues. Protective equipment is essential during any mould-related work: use an N95 respirator or better, safety goggles, disposable coveralls, and nitrile gloves. Work in a well-ventilated area, ideally with a fan directing airflow to the outside. If mould is present in areas with significant water damage or if growth spans multiple rooms, consider pausing work and seeking professional remediation. Never mix cleaning agents that could release toxic gases, such as bleach and ammonia, as this creates dangerous fumes. When in doubt about the extent of contamination, prioritize safety and consult a licensed mould remediation specialist.
Mold exposure isn’t just a nuisance; it can affect indoor air quality and long-term health. The Mold Removal Lab team recommends taking a cautious, evidence-based approach: verify moisture sources, protect occupants, and proceed with proper containment and cleaning methods. Always document the area before and after remediation to track progress and verify that growth has been removed. If symptoms persist after cleaning, seek medical advice and consider retesting the space to ensure the environment is safe before reoccupation.
DIY vs professional remediation: when to decide
DIY remediation is feasible for small, tightly bounded outbreaks (typically under 10 square feet) and when the mould is on nonporous surfaces, such as tiles or glass. For larger areas, porous materials (drywall, insulation, carpeting), or extensive growth with multiple rooms, professional remediation is advised. A professional team can use specialized equipment, such as HEPA air scrubbers and negative pressure containment, to keep mould spores from spreading. They can also identify hidden moisture sources, perform thorough cleaning, and ensure proper drying and sealing to prevent recurrence. The decision often hinges on safety, health risk, and the home's structural integrity. If you have asthma, a history of allergies, or mould recurs after cleaning, professional intervention is prudent. The Mold Removal Lab guidance emphasizes starting with moisture control and containment, then evaluating the scale of the problem to determine the right path forward.
Additionally, large-scale or high-toxicity mould growth should be treated as a potentially hazardous situation requiring professional remediation. In such cases, you may need to coordinate with a contractor, insurer, and in some cases local health departments. Regardless of the route chosen, you should document work performed, maintain a log of moisture sources, and schedule follow-up checks to confirm complete remediation and stabilization of humidity and temperature in the space.
Step-by-step overview of the process
Below is a high-level view of the recommended process, which you will see in detail in the dedicated STEP-BY-STEP section. Start with identifying moisture sources, isolating the area, wearing PPE, and gathering essential tools. Then proceed with cleaning nonporous surfaces, addressing porous materials if necessary, and ensuring thorough drying. Finally, repair the moisture source, re-check for mould growth, and implement long-term prevention measures. This overview helps homeowners gauge the scope of work and prepare for a safe remediation effort. For most households, following a clean, documented process reduces health risks and improves indoor air quality over time.
- Identify moisture sources and affected areas
- Isolate the work area to prevent spore spread
- Use proper PPE and cleaning methods
- Dry thoroughly and monitor the space
- Repair leaks and improve ventilation
- Reassess after remediation to confirm success
Prevention and ongoing monitoring
Prevention is the best remediation. After removing black mould, implement moisture-control strategies: fix leaks promptly, seal windows against condensation, and install dehumidifiers or ventilation fans in damp rooms. Regular inspections, especially in kitchens, bathrooms, basements, and laundry areas, help catch issues early. Use moisture meters in critical spots to quantify humidity levels; aim to keep indoor relative humidity below 60%, preferably around 40–50% in living spaces. Clear boundaries between cleanable mould and structural concerns are essential; porous materials impregnated with mould that cannot be properly cleaned should be removed and replaced, and replaced materials must be properly dried before sealing. The Mold Removal Lab team emphasizes maintenance, including checking HVAC systems, cleaning dryer vents, and ensuring attic and crawl space moisture control. By maintaining a dry, well-ventilated home, you reduce the likelihood of regrowth and preserve indoor air quality for years to come.
Tools, PPE, and products: choosing safe options
Selecting the right tools and cleaners helps prevent cross-contamination and protects occupants. Recommended PPE includes an N95 respirator (or better), protective goggles, gloves, and disposable coveralls. Essential tools—the HEPA vacuum, scrub brushes, microfiber cloths, and spray bottles—help contain and remove mould without spreading spores. For cleaning, start with detergent and water on nonporous surfaces, followed by a targeted disinfectant when necessary. On porous materials, consider removal and replacement rather than deep cleaning. If you do use a chemical cleaner, ensure you follow label directions, never mix cleaners, and ventilate the area. For severe cases, professional-grade equipment and containment strategies may be required to achieve safe remediation. The goal is to remove visible mould, dry surfaces promptly, and remove the moisture source to prevent future growth. The Mold Removal Lab guidance emphasizes using non-toxic or low-toxicity products whenever possible and verifying surface dryness before concluding a remediation effort.
Documentation, verification, and post-remediation monitoring
After remediation, document the workspace with photos and notes about humidity, temperature, and materials replaced. Recheck the previously affected zones for any signs of regrowth within the first few weeks, especially after rainy seasons or high humidity periods. If mould returns, reassess moisture sources and consider retesting or deeper remediation. Keeping a log helps you monitor trends, facilitates communication with contractors or insurers, and supports long-term prevention. The Mold Removal Lab team recommends a scheduled follow-up check within 2–3 months and periodic humidity checks to maintain a healthy indoor environment.
Tools & Materials
- Nitrile gloves(Disposable and chemical-resistant)
- N95 respirator or higher(Fit-tested if possible)
- Safety goggles(Protect eyes from splashes)
- Disposable coveralls(Optional but recommended for extensive work)
- HEPA vacuum cleaner(Use with double filtration)
- Scrub brushes and microfiber cloths(For scrubbing and wiping)
- Detergent or mold-cleaning solution(Mild detergent preferred)
- Nonporous surface cleaner(Soap and water; consider EPA-registered cleaners)
- Bleach (optional for nonporous surfaces)(Dilute 1:10 with water; ensure ventilation)
- Plastic sheeting and painter's tape(Contain and isolate area)
- Drop cloths or old towels(Protect surrounding areas)
- Fan or dehumidifier(Speed up drying)
- Moisture meter or hygrometer(Assess humidity levels)
- Trash bags (heavy-duty)(Seal and dispose of contaminated materials)
Steps
Estimated time: Estimated total time: 4-8 hours
- 1
Identify moisture source
Inspect for leaks, condensation, or water intrusion. Document affected areas with photos to guide remediation and communicate with any contractors.
Tip: Pinpoint the root cause to prevent recurrence. - 2
Isolate and prepare the area
Seal off the room with plastic sheeting and tape to prevent spore spread. Close doors and vents to minimize airflow through other spaces.
Tip: Use a separate entry/exit for the contained area if possible. - 3
Wear PPE and assemble tools
Put on N95, eye protection, gloves, and coveralls. Lay out all cleaning supplies within reach before starting.
Tip: Check respirator fit and seal around the nose. - 4
Clean nonporous surfaces
Wipe walls, tiles, and hard surfaces with detergent and water. Rinse and dry thoroughly.
Tip: Avoid letting damp surfaces stay wet for long. - 5
Address porous materials
Porous items with extensive mould growth (drywall, carpet, insulation) should be removed and replaced when necessary.
Tip: Do not attempt to salvage severely damaged materials. - 6
Disinfect if appropriate
On nonporous surfaces, apply a diluted disinfectant or 1:10 bleach solution if safe and allowed by the surface.
Tip: Ventilate well and never mix cleaners. - 7
Dry thoroughly
Use fans and dehumidifiers to bring humidity below 60% and dry surfaces within 24–48 hours.
Tip: Prolonged dampness invites regrowth. - 8
Repair moisture sources and monitor
Fix leaks, improve ventilation, and install humidity-control measures. Recheck the area after 2–4 weeks.
Tip: Maintain humidity around 40–50% where possible.
FAQ
Is black mould removal dangerous?
Yes, mould exposure can irritate the lungs and skin, especially for sensitive individuals. Wear proper PPE, ensure good ventilation, and limit disturbed area size. For large or ongoing growth, seek professional remediation.
Yes. Mould exposure can irritate the lungs and skin. Use PPE, ventilate, and consider professional help for large or persistent growth.
Can I remove mould myself at home?
Small, contained areas on nonporous surfaces can be tackled by homeowners with proper precautions. Major growth, porous materials, or hidden mould behind walls should be handled by a professional.
DIY is possible for small, contained spots, but for larger or hidden growth, hire a pro.
How long does it take to dry after removal?
Drying times vary with room size and ventilation but typically range from 24 to 72 hours. Use dehumidifiers and ensure airflow to speed up the process.
Drying usually takes 1 to 3 days with proper airflow and dehumidification.
Should I test for mould after remediation?
Post-remediation testing is optional for small areas but recommended after large outbreaks or if symptoms persist. It helps confirm the space is free of active mould growth.
Testing can confirm success, especially after large outbreaks.
What if mould keeps coming back?
Recurring mould usually signals an unresolved moisture issue. Reassess humidity, leaks, and ventilation, and consider professional assessment if the problem persists.
If mould recurs, recheck moisture and consider professional help.
Are household cleaners effective for black mould?
Detergents and water clean nonporous surfaces effectively. For longer-term disinfection on nonporous surfaces, use approved cleaners; avoid aggressive scrubbing that spreads spores.
Detergents clean; use approved cleaners and avoid aggressive scrubbing.
The Essentials
- Identify moisture sources before remediation
- Use proper PPE and containment to prevent spores spreading
- Differentiate between DIY-safe areas and large-scale mould growth
- Dry thoroughly and monitor humidity to prevent recurrence
- Replace porous materials if contaminated