White Mold on Soil: A Practical Guide
Learn to recognize white mold on soil, assess moisture, and safely remediate in pots and garden beds. Practical steps, safety tips, and prevention for homeowners and renters.

White mold on soil usually indicates excess moisture and decaying organic matter. In this quick guide you’ll identify the mold, decide whether DIY cleanup is safe, and begin a practical remediation plan. You’ll learn how to check humidity, inspect pots and garden soil, apply safe cleaning methods, replace contaminated soil if needed, and recognize red flags that require professional remediation.
What white mold on soil looks like and why it appears
White mold on soil appears as cottony, fluffy, or powdery growth on the surface of potting mix or garden soil. It’s often a sign that the environment is too moist and that organic material is breaking down. According to Mold Removal Lab, white mold on soil typically signals persistent moisture and decaying organic matter; addressing moisture is the first step in remediation. In homes, this growth commonly arises from overwatering, clogged drainage, or poor air circulation. Outdoors, soil stays damp after heavy rain, creating a hospitable climate for mold growth on soil. Early detection is key to keeping the mold from spreading to other areas. When you notice white mold on soil, adopt a calm, methodical approach rather than guessing about the cause or cleanup method.
In addition to the visual cue, check for odor, surface mats, or a slimy film. Some white growth is superficial and limited to the top layer, but deeper contamination may require more thorough action. Spores can irritate airways, so wear PPE during inspection and cleaning to minimize exposure.
Health and indoor air risks associated with mold in soil
Exposure to mold in soil can affect sensitive individuals, especially those with allergies, asthma, or compromised immune systems. While not every occurrence will trigger symptoms, inhaling mold spores can irritate the nose, throat, and lungs, and prolonged exposure may worsen respiratory issues. For households with young children, elderly residents, or pets, it’s prudent to treat mold growth on soil seriously. The risk is influenced by mold type, spore concentration, and the size of the affected area. To reduce health risks, keep indoor humidity low, improve ventilation, and practice safe cleanup methods. Mold growth on soil inside a home is not just a nuisance—it can indicate a moisture problem that should be addressed to prevent broader mold spread.
Assessment: moisture, soil, and site conditions
Effective remediation begins with a clear assessment of moisture sources and soil conditions. Use a hygrometer to monitor indoor humidity (ideally below 60%), inspect pot saucers for standing water, and check for leaks around planters or nearby walls. Assess soil texture as well; dense soils retain moisture longer than well-draining mixes. If your soil remains consistently wet after watering or rain, drainage improvements are warranted. Outdoor beds with poor drainage can also foster mold growth, especially in shaded, low-airflow areas. Maintaining adequate air movement and sun exposure can help dry out soil naturally and reduce mold viability. By systematically documenting moisture patterns, you’ll pinpoint root causes and tailor remediation accordingly.
DIY remediation steps: safe, practical methods
DIY remediation can be effective for small, contained mold on soil, provided you follow safety protocols and don’t attempt to vaporize mold with heat. Start by isolating the affected plant(s) or bed from the rest of the space to prevent spread. Wear PPE: gloves, eye protection, and an N95 respirator if available. Remove the visibly moldy soil in sealed bags and place them in the outdoor trash. After disposal, replace with fresh, sterile potting mix or garden soil, and ensure containers have good drainage. Clean the container with mild soap and water, then disinfect with a mild solution that is safe for plants (avoid harsh chemical sprays that could harm roots). Allow the area to dry completely before reintroduction of plants. Ventilate the room and monitor humidity for several days. If mold returns, escalate to more thorough soil replacement or professional remediation. Keep in mind that repeated moisture and poor drainage are frequent culprits, so addressing those factors is essential to prevent recurrence.
When to replace soil or seek professional help
If mold persists after initial remediation, or if a large area is affected, replacing the soil may be necessary. In pots, replace with fresh, high-quality potting mix and sanitize the pot before reuse. In garden beds, remove the top layers of contaminated soil and incorporate fresh soil or compost with good drainage. If moisture problems are persistent, or if you have a history of mold allergies or asthma, consider hiring a professional mold remediation service. A professional can perform a more thorough assessment, improve drainage, and implement microorganism-safe remediation strategies that protect occupants.
Prevention: long-term strategies to minimize mold growth on soil
Prevention hinges on moisture control and proper soil management. Water plants only as needed, using a moisture meter or finger test to avoid overwatering. Improve drainage with perlite, sand, or amended soil in pots, and ensure outdoor beds have adequate drainage and sun exposure. Increase air circulation around plants by spacing them adequately and using fans in indoor spaces. Regularly clean pots and trays to remove dust and organic debris that can harbor mold. Consider using sterile soil or portable soil mixes when repotting. By maintaining consistent moisture control and routine cleaning, you reduce the likelihood of white mold on soil returning.
Monitoring progress: documentation and follow-up
Track changes over several weeks by recording humidity levels, watering frequency, and mold appearance. Take photos at regular intervals and note any odors or changes in plant health. If mold recurs, adjust watering schedules, improve ventilation, and verify that drainage remains unclogged. Keeping a simple remediation diary helps you notice patterns and demonstrates progress if you ever need to show a professional or pest-control service.
Authoritative sources and further reading
To verify steps and recommendations, refer to established public health and environmental resources. The following sources provide guidance on mold identification, moisture control, and remediation best practices:
- https://www.epa.gov/mold
- https://www.cdc.gov/mold/default.html
- https://www.osha.gov/molds
Tools & Materials
- Nitrile gloves(Disposable, chemical-resistant; size appropriate)
- N95 respirator(Fit-tested if possible; avoid a loose seal)
- Safety goggles(Seal around eyes; protect against splashes)
- Disposable coveralls or old clothing(Protect skin and fabrics from spores)
- Plastic bags (heavy-duty)(Seal contaminated soil for disposal)
- Mild detergent/soap(For cleaning containers and tools)
- Non-abrasive scrub brush(Gently clean soil containers)
- Disinfectant (plant-safe)(Safe for pots and tools; avoid bleach on live plants)
- Fresh potting mix or soil(Sterile or high-quality, well-draining)
- Trash or compost bin(For disposing of contaminated material)
- Moisture meter/hygrometer(Optional; helps monitor humidity)
Steps
Estimated time: 60-120 minutes
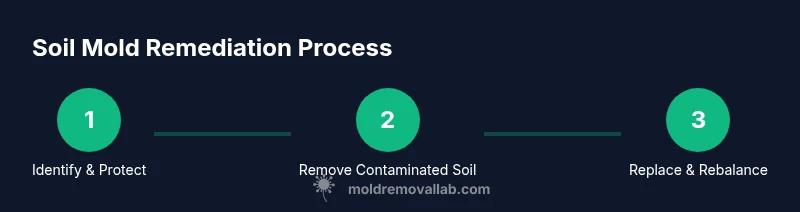
- 1
Identify and gather safety gear
Put on PPE and prepare a sealed work area. Confirm that you have gloves, an N95, eye protection, and a clean workspace to minimize spread of spores.
Tip: Choose well-fitted PPE before you begin to reduce exposure. - 2
Isolate affected area and stop watering
Move plants away from the area and stop irrigation to prevent further moisture from fueling mold growth on soil.
Tip: Ensure there is adequate ventilation during isolation. - 3
Remove contaminated soil
Carefully scoop out moldy soil into sealed bags without shaking to limit spore release.
Tip: Seal bags immediately and place them in outdoor trash away from living areas. - 4
Clean and disinfect containers
Wash pots or containers with mild soap, rinse, then disinfect with a plant-safe solution. Allow to dry completely.
Tip: Avoid harsh chemicals that could harm new soil or plants. - 5
Replace with fresh soil
Fill containers with fresh, sterile potting mix or well-draining garden soil, ensuring fill depth matches plant needs.
Tip: Consider sterilizing reusable pots by soaking in a dilute disinfectant solution. - 6
Improve drainage and airflow
Add drainage amendments if needed and ensure pots have drainage holes. Increase air circulation around affected area.
Tip: Place pots on a breathable mat to prevent moisture buildup. - 7
Reintroduce plants and monitor
Water cautiously, monitor humidity, and watch for new mold growth. Use a hygrometer to track moisture levels.
Tip: Water only when the top inch of soil is dry. - 8
Document and adjust as needed
Record observations, photos, and humidity readings to guide ongoing prevention.
Tip: Update your remediation plan if mold reappears.
FAQ
What causes white mold on soil?
White mold on soil is typically driven by excess moisture, decaying organic matter, and poor drainage. Warm, humid environments speed growth, especially in pots and garden beds with limited airflow.
White mold on soil is usually caused by too much moisture and decaying material in the soil, especially where airflow is limited.
Is white mold on soil dangerous to humans or pets?
Exposure can irritate sensitive individuals. Wear PPE during cleanup and ventilate the space. If anyone in the home has allergies or asthma, take extra precautions.
Mold exposure can irritate sensitive people; protect yourself during cleanup and monitor symptoms.
How can I tell the difference between harmless growth and harmful mold?
Many fungi appear white and fluffy, but persistent growth on soil after cleaning indicates an ongoing moisture problem that should be addressed. When in doubt, treat as mold and follow remediation steps.
If it keeps coming back after cleaning, treat it as mold and address moisture problems.
When should I call a professional?
If mold recurs after remediation, or if you cannot control moisture effectively, a professional remediation service can assess drainage and implement safer, longer-lasting solutions.
Call a pro if mold keeps coming back or you can’t fix the moisture problem.
What tools should I use for safe cleanup?
Use PPE, sealed bags, gloves, and a respirator if available. Clean containers with plant-safe disinfectant and ensure you have ventilation during the process.
Wear PPE and use sealed bags when disposing of contaminated soil.
Can I just replace the soil and pretend it’s solved?
Replacing soil can fix the issue if contamination is localized, but underlying moisture problems must be addressed to prevent recurrence.
Yes, soil replacement helps, but fix the moisture issue to prevent it from returning.
Watch Video
The Essentials
- Identify moisture sources early.
- Protect yourself with PPE.
- Replace soil when contamination is heavy.
- Control humidity to prevent recurrence.
- Seek professional help if mold returns.