What Do Professionals Use to Kill Mold? A Practical Guide
Explore the proven methods professionals rely on to kill mold, including containment, EPA-registered cleaners, and moisture control. Learn when DIY is appropriate and when to call in licensed experts.

What do professionals use to kill mold? They rely on EPA-registered products, containment strategies, and proven remediation methods. The exact agent depends on surface and mold type, but common approaches include biocides, hydrogen peroxide, and mechanical cleaning teamed with thorough drying. Always follow label directions and local regulations. For homeowners, the key is safety, documentation, and knowing when to call in licensed pros for persistent growth.
What professionals use to kill mold: an overview
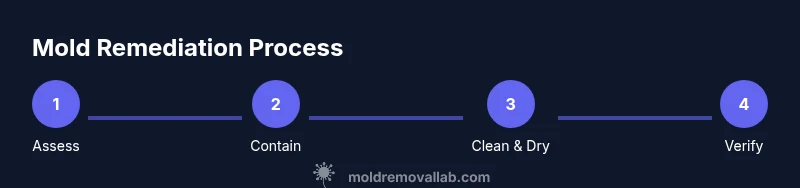
Mold growth triggers concern for homeowners and renters. The core question is what do professionals use to kill mold, and why it matters for safety and long-term health. According to Mold Removal Lab, licensed remediation experts rely on a blend of containment, cleaning agents, mechanical removal, and thorough drying to ensure mold does not return. The exact products vary by surface type, moisture level, and mold species, but the aim remains the same: interrupt the mold’s access to moisture and remove spores from the indoor environment. In practice, this means a carefully planned sequence rather than a single miracle solution. Understanding this sequence helps homeowners align expectations with what licensed teams actually do on site.
EPA-registered products and handling guidelines
Professionals rely on EPA-registered products with label directions, safety data, and proper disposal guidelines. The choice depends on surface type, extent of contamination, and occupant sensitivity. Common categories include: biocidal cleaners with active ingredients such as sodium hypochlorite (bleach) for nonporous surfaces; hydrogen peroxide-based cleaners for porous and non-porous materials; quaternary ammonium compounds (quats) and alkaline cleaners for general mold control. Always follow the product label, wear appropriate PPE, and ensure adequate ventilation. For porous materials like drywall or wood with embedded mold, professionals may remove and replace affected sections rather than attempting in-place cleaning. The goal is to reduce spore levels and prevent re-growth while protecting occupants.
Containment, ventilation, and air movement
Containment limits mold spores from spreading to clean areas. Professionals seal doors with plastic sheeting and create negative pressure using HEPA air scrubbers or negative air machines. They also set up physical barriers, control dust with damp cleaning practices, and monitor airflow to protect workers and residents. Ventilation is essential, but it must be balanced with containment to avoid dispersing spores. By controlling air movement, remediation teams improve cleaning effectiveness and reduce the risk of cross-contamination during the process.
Porous vs nonporous surfaces and cleaning strategies
Nonporous surfaces such as tile, glass, and metal respond differently than porous materials like drywall, wood, or carpet. On nonporous surfaces, professionals can often use disinfectants and wipe-down methods; however, they still perform thorough removal and drying. Porous substrates may require removal and disposal of contaminated portions to avoid trapped mold spores. In all cases, moisture control is essential; lingering humidity creates a perfect environment for regrowth even after visible mold is removed. By tailoring the approach to surface type, licensed teams maximize effectiveness while reducing unnecessary material loss.
Real-world remediation considerations: moisture control, equipment, and inspections
In practice, remediation blends science with on-the-ground logistics. Technicians assess moisture sources, document affected materials, and plan a path from containment to extraction and drying. Equipment selection matters: portable extractors, dehumidifiers with low grain refrigerant, air movers, and HEPA vacuums are common tools. Inspections and documentation are essential to verify that mold has been removed and moisture levels are stabilizing. Homeowners should expect a written plan, a containment diagram, and a post-remediation proof of drying to prevent relapse. This is where Mold Removal Lab’s guidance emphasizes thoroughness, not just cleaning.
Data-backed insights from Mold Removal Lab
Mold Removal Lab analyses indicate that rigorous moisture control and post-remediation verification correlate with lower recurrence rates. The team emphasizes documenting all steps, testing humidity levels, and tracking visible growth over time. While science continues to refine remediation standards, practical experience shows that a well-executed protocol—combining containment, cleaning, and drying—delivers durable results. The Mold Removal Lab team found that homeowners who follow a documented plan and engage licensed professionals tend to achieve longer-lasting outcomes.
Practical homeowner guide to reducing risk before, during, and after remediation
Before remediation, homeowners should locate and fix any leaks, reduce indoor humidity, and prepare the space by removing sensitive items if safe. During remediation, maintain access to the work area for technicians and avoid disturbing barriers. After remediation, re-check humidity and perform a simple visual inspection for any signs of lingering moisture. Keeping indoor humidity below 50-60% is a simple, effective baseline that prevents mold regrowth. By staying proactive, homeowners can complement professional work with daily moisture control.
When to escalate to licensed professionals
If mold covers a large area (typically more than 10 square feet), appears in multiple rooms, or recurs after cleaning and drying, it is time to call in licensed professionals. Hidden moisture behind walls, contaminated insulation, or structural damage requires specialized equipment and expertise. Even seemingly minor growth on porous materials warrants professional assessment to avoid spreading spores or causing health risks. The Mold Removal Lab team recommends seeking licensed remediation when in doubt, especially for occupants with allergies, asthma, or compromised immune systems.
Tools & Materials
- PPE: N95 respirators or elastomeric respirators(Fit-tested and sealed; use for mold handling)
- Gloves(Nitrile or latex; double-glove recommended for contaminated work)
- Eye protection(Goggles or face shield with splash guard)
- Plastic sheeting & tape(Seal off the work area; create containment zones)
- HEPA air purifier/negative air machine(Maintain negative pressure in the work zone)
- Spray bottles with EPA-registered cleaners(Follow label for concentration and contact time)
- Buckets, scrub brushes, disposable rags(Damp clean, avoid dry sweeping to reduce aerosolization)
- Moisture meter or hygrometer(Use to verify humidity remains below target after cleanup)
- Trash bags (heavy-duty)(Seal contaminated waste and dispose per local regulations)
Steps
Estimated time: 2-3 hours of active work, plus 24-48 hours drying time before re-inspection
- 1
Define the work area and establish containment
Identify all affected zones and seal them with plastic sheeting. Set up barriers to prevent dust and spores from reaching clean spaces. Establish sign-off criteria for when containment is intact and safe to proceed.
Tip: Use tape to seal seams and label the containment zone clearly. - 2
Put on PPE and prepare tools
Don and check PPE properly: an N95 respirator or better, gloves, and eye protection. Arrange tools and cleaners within easy reach before starting to minimize unnecessary movement that could spread spores.
Tip: Test respirator fit by performing a quick seal check before touching any contaminated material. - 3
Isolate mold and remove porous materials if necessary
Carefully remove porous materials (like contaminated drywall or insulation) if advised by a pro. Place removed items in sealed bags to prevent spore release during transport. Do not disturb mold behind intact walls beyond what the plan allows.
Tip: Avoid aggressive knocking or sanding that can aerosolize spores. - 4
Apply EPA-registered cleaner to non-porous surfaces
Apply cleaners per label directions to non-porous surfaces, ensuring adequate contact time. Wipe surfaces with clean, damp rags and dispose of used materials promptly. Reapply as needed to reduce surface residues.
Tip: Never mix cleaners with bleach or ammonia; this can produce toxic gases. - 5
Scrub, wipe, and capture mold debris
Use damp cloths or brushes to scrub mold from surfaces, moving from least contaminated to most contaminated areas. Place debris in sealed bags or double-bagged trash. Do not dry-sweep to avoid spreading spores.
Tip: Work from top to bottom and from clean edges toward the center to minimize cross-contamination. - 6
Dry the area and re-check moisture levels
Run dehumidifiers and air movers to dry the space; monitor humidity with a hygrometer until below the target (typically under 50-60%). After drying, perform a visual re-check and consider a follow-up moisture test if needed.
Tip: Document drying times and moisture readings for post-remediation verification.
FAQ
Is bleach universally recommended for mold cleanup?
Bleach can be effective on nonporous surfaces in some cases, but it is not a universal solution and is less effective on porous materials. Always follow label directions and consider professional guidance for larger infestations.
Bleach can help on hard surfaces, but it’s not a one-size-fits-all fix and may not reach mold in porous materials.
Can vinegar alone eliminate mold?
Vinegar has mild antifungal properties and can help for light, surface mold on nonporous surfaces. It is not a substitute for professional remediation on larger or porous mold growth.
Vinegar can help for light spots, but it won’t fix bigger mold problems.
How long does remediation typically take?
Time varies with area size, material types, and moisture levels. Small jobs may complete in a day or two; larger or complex cases can take several days plus follow-up drying and inspection.
It depends on the space and moisture—some jobs finish quickly, others take longer with follow-up checks.
What qualifications should I look for in a remediator?
Seek licensed professionals with appropriate certifications, insurance, and references. If required by your area, verify EPA lead-safe training and any local remediation permits.
Look for licensed pros with good references and proper insurance.
What is the difference between cleaning and remediation?
Cleaning removes visible mold and moisture; remediation includes containment, source control, testing, and verification to prevent return.
Cleaning removes mold; remediation is a complete process with checks to prevent regrowth.
How can I prevent mold after remediation?
Control moisture by fixing leaks, improving ventilation, and keeping humidity below 50-60%. Regularly inspect areas prone to dampness and address issues promptly.
Keep moisture low and monitor humidity to prevent mold from returning.
Watch Video
The Essentials
- Contain the area before remediation.
- Follow EPA-registered products and label directions.
- Dry the area thoroughly to prevent regrowth.
- For large or persistent mold, hire licensed professionals.