Mold in Plant Soil: Identification, Risks, and Safe Remediation
Identify mold in plant soil, understand health risks, and remediate safely with practical steps. Mold Removal Lab offers clear, actionable guidance for homeowners seeking healthy houseplants and safer indoor air.

You will learn to identify mold in plant soil, evaluate health and plant risks, and follow a safe remediation workflow. This quick guide covers common signs, when to test, and practical steps you can take today to protect your home. According to Mold Removal Lab, early detection and controlled cleanup reduce moisture-related mold issues and prevent spread.
What mold in plant soil is and why it matters
Plant soil mold consists of visible colonies of fungi that grow in damp, organic-rich soil. In the home, mold in plant soil signals excess moisture and poor drainage, which can lead to root rot and stunted growth. The presence of mold in plant soil can also release spores that contribute to allergic reactions and respiratory irritation in sensitive people and pets. According to Mold Removal Lab, moisture control is the most effective defense against mold progression in potted plants. Even if a plant appears healthy, persistent mold suggests micro-environment conditions—overwatering, low light, high humidity—that can foster fungal growth. Understanding the signs helps you act before the mold spreads to pots, surfaces, or neighboring plants. This section lays the foundation for safe remediation by describing typical appearances (white powdery coatings, greenish tufts, or slimy films) and common sources (overwatered soil, decaying organic matter, contaminated potting mix).
Common molds found in houseplant soil
In houseplant environments, several molds commonly appear in soil, including species of Aspergillus, Penicillium, Cladosporium, and Rhizopus. These fungi thrive in moist, nutrient-rich substrates and can form fuzzy colonies or powdery coatings on the soil surface. While some molds are relatively benign, others can irritate lungs or trigger allergies in susceptible individuals. The key risk isn’t always the plant itself but the spores that become airborne when you water or repot. Proper identification helps you decide whether to simply dry out the potting mix, repot into fresh soil, or seek professional testing if symptoms persist. Mold in plant soil often signals a broader moisture problem in the potting setup, including drainage issues or persistent humidity levels.
Health and plant implications of mold in plant soil
Mold in plant soil can affect both human occupants and plants. For people, mold spores may aggravate allergies, asthma, or respiratory irritation, particularly in children, the elderly, or those with preexisting conditions. The risk increases with mold diversity and spore load. For plants, molds compete with roots for nutrients and water, potentially causing slower growth or sudden decline. The interaction between moisture, temperature, and organic matter creates a conducive environment for mold colonies to flourish. The Mold Removal Lab Team emphasizes that addressing the moisture source—improved drainage, proper pot size, and balanced watering—reduces both mold growth and plant stress. This dual focus is essential for long-term results.
When to test for mold in plant soil and how
If you notice persistent mold growth despite proper watering, testing can confirm species and spore load, guiding remediation. Start with a simple visual check and moisture assessment, then consider a soil test kit or professional assay if signs continue. Mold Removal Lab Analysis, 2026, suggests testing is most informative when you see recurring mold after routine care or when household members report new respiratory symptoms. Collect soil samples from the pot’s surface and deeper layers, noting moisture level, light exposure, and watering frequency. A positive result for mold in plant soil warrants immediate action to reduce moisture, replace soil, and sanitize tools and containers.
Step-by-step remediation approach
Remediation begins with containment and assessment. First, isolate the affected plant to prevent spore spread to other houseplants. Then, remove visibly moldy soil from the top layer and inspect roots for rot. Clean the pot and tools with a simple disinfectant rinse, and consider replacing the potting mix entirely. Finally, re-pot the plant in fresh, well-draining soil and adjust watering to keep the soil surface dry between waterings. According to Mold Removal Lab, addressing moisture sources and using clean materials are critical to stopping mold cycles and supporting plant recovery.
Prevention strategies to keep mold from returning
Prevention hinges on moisture control and hygiene. Use pots with drainage holes, a breathable potting mix, and a well-sized container to avoid standing water. Water plants only when the top inch of soil is dry, and ensure spaces have adequate airflow to reduce humidity. Regularly inspect for signs of mold, prune decaying plant matter, and sanitize tools after each use. Consider a moisture meter or humidity monitor in rooms with high humidity. Mold in plant soil is easier to manage when you establish a routine of prevention and quick action at the first signs of trouble.
Quick care checklist for mold-prone plants
- Inspect soil monthly for discolored patches or a musty odor
- Replace soil after cleaning or repotting a moldy plant
- Use sterile tools and washed containers for each plant
- Maintain airflow and avoid overwatering
- Keep humidity below 60% in interior environments
Tools & Materials
- new pot with drainage holes(Match pot size to plant; avoid oversized pots that trap moisture)
- fresh potting soil or sterile potting mix(Choose a breathable mix; avoid reused soil from moldy pots)
- gloves (nitrile or latex)(Protect hands from mold; disposable gloves preferred for disposal)
- protective mask (N95 or equivalent)(Minimize inhalation of spores during remediation)
- handsaw/pruners or sterilized scissors(Trim dead roots or damaged stems; sanitize before reuse)
- disposable trash bags(Seal contaminated soil and plant parts for disposal)
- paper towels or clean rags(Wipe surfaces; dispose of soiled materials properly)
- spray bottle with clean water(Mist to help remove soil clumps without creating aerosols)
- isopropyl alcohol or hydrogen peroxide (diluted)(Used to disinfect tools and pots after soil removal)
Steps
Estimated time: 60-120 minutes
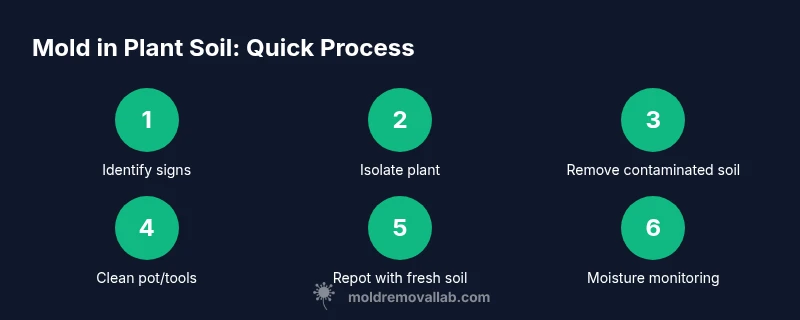
- 1
Identify signs and isolate
Examine visible mold growth on soil and debris; note musty odor, slimy patches, and powdery coatings. Isolate the plant from others to prevent spores from spreading. This step reduces cross-contamination as you begin remediation.
Tip: Work in a well-ventilated area; use a dedicated workspace if possible. - 2
Protect yourself and workspace
Put on gloves, a mask, and eye protection. Cover nearby surfaces with plastic or old sheets to catch any falling debris. This minimizes exposure and keeps other items clean.
Tip: Avoid touching your face while handling moldy soil. - 3
Remove contaminated soil
Gently scoop away the top layer of soil where mold is most visible. Avoid disturbing healthy roots. Place removed soil into a sealed bag for disposal.
Tip: Do not reuse the contaminated soil on other plants. - 4
Clean the pot and tools
Wash the pot with soap and water, then disinfect with a diluted solution of isopropyl alcohol or hydrogen peroxide. Rinse and dry thoroughly before reuse.
Tip: Use separate tools for this plant to prevent cross-contamination. - 5
Inspect roots and prune
Check roots for rot or discoloration; trim affected portions with sterilized scissors. Healthy roots should be white and firm. Removing damaged roots helps plant recovery.
Tip: Sterilize tools after cutting to avoid spreading mold. - 6
Repot with fresh soil
Fill a clean pot with fresh, well-draining soil. Place the plant gently and avoid compacting the soil too tightly. Water minimally to start, allowing the top layer to dry between waterings.
Tip: Choose a soil mix designed for good drainage and air circulation.
FAQ
Is mold in plant soil dangerous to people?
Most mold in soil is not immediately dangerous, but spores can trigger allergies and respiratory issues in sensitive individuals. If someone in your home has asthma or severe allergies, take mold seriously and remediate promptly.
Mold in soil can trigger allergies for some people, so take precautions and remediate if symptoms appear.
Can I reuse soil after remediation?
Contaminated soil should generally be replaced. If you must reuse soil, ensure it is sterilized or heated and dried, and consider replacing it with fresh mix to prevent recurrence.
Usually, it’s best to use fresh soil rather than reusing moldy mix.
Should I throw away the plant?
If mold recurs after remediation or root health is poor, it’s safer to discard the plant. Mold can spread to other plants and degrade indoor air quality.
If the mold keeps coming back or the plant looks unhealthy, it’s safer to discard it.
What household products can I use to treat mold in plant soil?
Hydrogen peroxide or diluted vinegar can help in some cases, but avoid bleach around plants. Always test on a small area and dilute appropriately to protect root health.
Hydrogen peroxide or diluted vinegar can help, but avoid bleach near plants.
How long does mold remediation take?
A typical remediation routine takes 1–2 hours for one plant, plus drying time. Factors include mold extent, plant health, and moisture management.
Most remediation can be done in a couple of hours, plus time to dry and recheck moisture.
When should I phone a professional?
Call a professional if mold recurs after remediation, if you have widespread mold in multiple pots, or if family members have persistent respiratory symptoms.
If mold keeps coming back or symptoms persist, seek professional help.
Watch Video
The Essentials
- Identify mold signs early and isolate the plant
- Replace contaminated soil and sanitize containers
- Control watering and humidity to prevent growth
- Use clean tools and proper PPE during remediation
- Seek professional help if mold recurs or symptoms persist