Mold Design: A Practical Home Remediation Guide
A practical mold design guide for homeowners, covering moisture control, assessment, remediation methods, and prevention strategies. Clear steps from Mold Removal Lab to keep your home safe.

By the end of this guide, you will be able to design an effective mold design and remediation plan for a home, with a focus on moisture control, safe containment, and non-toxic cleaning. You’ll identify when professional help is needed, choose appropriate methods, and implement prevention strategies to reduce reoccurrence. This quick overview helps homeowners decide between DIY steps and when to call a pro.
What Mold Design Means for Home Health
Mold design, in the context of residential spaces, is the deliberate planning of removal, containment, and prevention measures to maintain indoor air quality and reduce moisture-driven growth. According to Mold Removal Lab, the most effective mold design starts with understanding how humidity, leaks, and temperature interact with building materials. The goal is not only to clean a current outbreak but to design a resilient space that minimizes future growth. A well-planned mold design balances practical DIY actions with professional interventions when necessary. It emphasizes moisture management, proper containment to prevent cross-contamination, safe cleaning methods, and documentation. By framing remediation as a design task rather than a one-off cleanup, homeowners can anticipate risks, budget for necessary tools, and monitor progress over time. The Mold Removal Lab team found that proactive design decisions—like improved drainage around foundations and sealed crawl spaces—significantly reduce recurrence risk and support long-term health outcomes.
This section establishes the lens through which you will approach mold design: it is a systematic, repeatable process meant to protect inhabitants and preserve the home’s structure. You’ll learn how to translate symptoms of moisture trouble into concrete steps, checklists, and budgets. Expect to see how to balance DIY actions with when to call in professionals for safe containment and specialized remediation. The intent is to empower homeowners with a clear plan that reduces guesswork and increases confidence during a mold event.
Key Phases of a Home Mold Design Plan
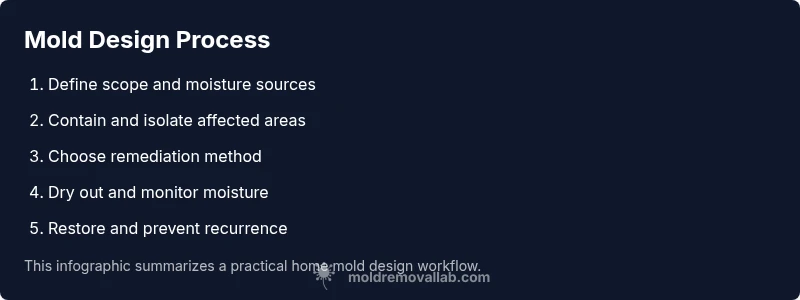
A robust mold design plan unfolds in phases that mirror design thinking: define scope, assess conditions, contain risk, remediate, dry out, restore, and prevent recurrence. The plan begins with a precise definition of affected areas, sources of moisture, and the extent of visible growth. The next phase involves systematic assessment using visual checks, moisture meters, and odor cues to map out scope. Containment is critical to limit spores and dust from spreading to clean areas or living spaces. Remediation methods are selected based on severity, material types, and safety considerations. After cleanup, thorough drying and moisture restoration are essential to prevent regrowth. Restoration and repair follow, aiming to bring spaces back to safe, comfortable condition. Finally, prevention measures—like ongoing humidity control, improved ventilation, and regular inspections—make the design approach resilient against future events. Throughout each phase, documentation records conditions, actions taken, and outcomes to inform future decisions.
Assessing Your Space: Visual Checks and Tools
Effective mold design starts with a careful assessment of your space. Begin with a visual survey of damp patches, staining, musty odors, and any evidence of leaks or condensation. Create a simple map of the affected zones, noting materials involved (drywall, wood, insulation) and any potential heat or moisture drivers (kitchens, bathrooms, roofs, basements). Gather tools such as a flashlight, notebook, tape measure, and a moisture meter if available. Take photos before any work begins and keep notes on water events, seasonal changes, and ventilation patterns. This assessment not only guides remediation but helps you decide between do-it-yourself steps and professional services. The goal is to establish a clear baseline so you can measure progress and verify that humidity and moisture levels are improving over time.
Containment and Isolation: Keeping Mold from Spreading
Containment is a core element of mold design. Establish physical barriers, seal doors and ducts if needed, and minimize traffic through affected areas to prevent cross-contamination. Use plastic sheeting to create negative or controlled environments where work is occurring, and avoid disturbing actively growing mold more than necessary. Proper personal protective equipment (PPE) protects you during this stage. Ventilate work areas to the outside when possible and seal HVAC intakes to prevent spores from circulating through the home. Documentation of containment measures helps future remediation efforts and ensures that other occupants remain safe during the process.
Safe Cleaning and Remediation Methods
Choosing safe, effective remediation methods is central to mold design. For non-porous surfaces, use damp cloths, mild detergents, and low-toxicity cleaners. Porous materials with extensive mold growth may require removal and replacement. Avoid bleach on porous surfaces as it can degrade materials and release more spores if not used correctly. In many cases, a combination of cleaning, disinfection, and careful disposal is appropriate. If you encounter materials with extensive fungal growth, or you suspect hidden mold behind walls, pause and call a professional. The emphasis is on controlled removal, containment, and maintaining air quality while preventing recontamination. The Mold Removal Lab approach encourages documenting each cleaning step and using non-toxic options whenever possible.
Moisture Management: The Core of Mold Design
Moisture control remains the cornerstone of any mold design strategy. Reducing humidity, fixing leaks promptly, and improving ventilation are foundational actions. Mold Removal Lab analysis shows that addressing moisture sources early dramatically reduces recurrence risk and supports long-term health in homes. Practical steps include repairing roof and plumbing leaks, improving attic and crawl-space ventilation, and keeping indoor humidity at reasonable levels through dehumidification or balanced ventilation. These actions help create an environment less conducive to mold growth and more conducive to a healthy living space. Regular checks after moisture events—such as rainstorms or plumbing repairs—help catch problems before they escalate.
Materials and Equipment: DIY vs Pro
Your mold design toolkit should include basic cleaning supplies, PPE, disposal bags, and a moisture meter if available. For DIY work, ensure you have non-toxic cleaners, protective gloves, eye protection, and a mask suitable for mold exposure. Porous materials showing mold damage often require professional evaluation or replacement. Heavy remediation, structural concerns, or large growth areas necessitate professional involvement. Keep a clear log of all materials used and disposal methods to support ongoing prevention and future home maintenance. A well-equipped homeowner can handle small, contained projects, while larger issues benefit from professional supervision to ensure safety and effectiveness.
Documentation and Records: Tracking Your Progress
Documenting your mold design journey helps you stay organized and prepared for future events. Keep photos, notes on moisture readings, dates of leaks fixed, and records of cleaning and restoration work. A well-documented plan supports insurance claims and communicates clearly with contractors or code officials. Include a simple checklist of tasks and their outcomes, and schedule follow-up checks to verify that remediation and prevention steps are working. Regular documentation also provides a historical reference to guide decisions if conditions change, such as during seasons with higher humidity or after major renovations.
Prevention: Long-Term Mold Design Strategies
Prevention is the best part of mold design. After addressing current growth, implement ongoing strategies: fix leaks promptly, maintain proper ventilation in bathrooms and kitchens, use exhaust fans, and monitor humidity levels. Consider improvements to insulation and vapor barriers, as well as routine inspections for signs of moisture or staining. Regularly replacing contaminated materials and maintaining a dry, well-ventilated home reduces the likelihood of future mold issues. The Mold Removal Lab team recommends adopting a routine prevention schedule that fits your climate and home design, turning remediation into a proactive habit rather than a reactive fix.
Common Mistakes and How to Avoid Them
Common errors include delaying containment, using aggressive chemicals on porous materials, and cleaning visible mold without addressing moisture sources. Another frequent pitfall is treating mold as a cosmetic issue rather than a moisture problem, which often leads to re-growth. Avoid over-wetting surfaces during cleaning and never mix cleaners without checking compatibility. Always wear PPE and ventilate the area. In longer projects, document decisions and maintain a consistent approach to prevent cross-contamination and incomplete remediation.
When to Hire a Professional: Decision Framework
Deciding when to hire a professional depends on the size of the affected area, complexity of the building, and potential hidden growth. If you encounter extensive growth, water intrusion, or mold behind walls, it is prudent to engage a licensed mold remediation professional. The decision framework considers safety, building integrity, and the potential for hidden growth that DIY steps may miss. The Mold Removal Lab team emphasizes that professional involvement ensures proper containment, testing, and documentation to protect occupants and structure.
Case Scenarios: Real-World Examples
Case 1: A bathroom with recurring mold on grout and under a poorly vented window was addressed by fixing the exhaust, sealing gaps, and thorough cleaning with non-toxic cleaners, followed by ongoing humidity monitoring. Case 2: A basement with moisture intrusion from a leaky foundation required a professional assessment to identify unseen mold behind drywall and insulation, with containment and controlled drying. In both cases, moisture management and proper documentation were the keys to success and prevention.
Tools & Materials
- Nitrile gloves(Disposable, powder-free)
- Protective eyewear(Goggles or safety glasses)
- N95 respirator or better(Fit-tested if possible)
- Disposable coveralls(Long sleeves; closed footwear optional)
- Flashlight or headlamp(Good lighting for inspection)
- Moisture meter(Prefer digital with RH reading)
- Plastic sheeting (6 mil)(For containment barriers)
- Duct tape or painter’s tape(Seal barriers and sheeting)
- Non-toxic household cleaners(Avoid ammonia on bleach)
- Disposal bags (heavy-duty)(Seal and dispose safely)
- HEPA vacuum (optional)(Useful for dust control)
- Camera or smartphone(Document before/after)
Steps
Estimated time: 8-16 hours spread over 2-3 days
- 1
Define the scope
Identify affected spaces, materials, and moisture sources. Create a simple map noting room layout, materials involved, and potential pathways for moisture intrusion. This defines the project boundaries and informs containment planning.
Tip: Document the exact locations of stains and leaks to guide remediation decisions. - 2
Gather tools and PPE
Assemble all necessary supplies before starting: PPE, cleaning agents, containment barriers, and disposal bags. Confirm you have adequate ventilation and lighting. This reduces delays and safety risks.
Tip: Check PPE fit before beginning work; ill-fitting gear undermines protection. - 3
Contain the area
Set up plastic barriers to isolate the work zone. Seal doors and HVAC intakes if needed and keep non-work areas out of the zone. Proper containment minimizes cross-contamination.
Tip: Avoid over-disturbing mold growth; aim for controlled, careful removal. - 4
Document and measure
Take photos and notes of moisture, stains, and growth from multiple angles. Record baseline conditions to compare progress and verify remediation effectiveness.
Tip: Use a checklist to ensure no area is overlooked. - 5
Choose remediation approach
Decide between DIY steps for minor, contained issues or professional remediation for larger or uncertain cases. Consider material type and the extent of growth.
Tip: When in doubt, consult a licensed professional for assessment. - 6
Clean and treat affected surfaces
Use non-toxic cleaners on non-porous surfaces and consider replacement for porous materials with extensive growth. Avoid aggressive chemical mixes and ensure surfaces dry fully.
Tip: Never mix cleaners; read label instructions for compatibility. - 7
Dry out the space
Run dehumidification and ventilation to reduce moisture. Monitor the space until it stays dry and no new growth is observed.
Tip: Keep doors and windows open if weather allows to promote air exchange. - 8
Restore and repair
Replace damaged materials and restore finishes once the area is dry. Ensure new materials are moisture-resistant and properly installed.
Tip: Seal new installations to minimize future moisture uptake. - 9
Reassess moisture and cleanliness
Recheck moisture levels and cleanliness post-remediation. Confirm there is no lingering odor and that growth has not returned.
Tip: Set up short-term, periodic rechecks to catch issues early. - 10
Document outcomes
Record actions taken, materials replaced, and results of moisture checks. Keep a file for future reference and for possible insurance needs.
Tip: Keep receipts and notes organized for easy retrieval. - 11
Implement prevention
Install or upgrade ventilation, fix leaks promptly, and monitor humidity. Prevention reduces future mold risk and protects health.
Tip: Schedule seasonal checks and maintain a clean, dry environment. - 12
Review and adjust plan
Evaluate outcomes and adjust prevention strategies as needed. A flexible plan better guards against evolving moisture challenges.
Tip: Use lessons learned to refine future mold design actions.
FAQ
Is mold design the same as mold remediation?
Mold design integrates assessment, containment, remediation, and prevention into a single plan. Remediation is a phase within that plan, focused on removing mold growth safely. They are related but not identical steps.
Mold design includes planning and prevention, while remediation is the actual removal step within that plan.
When should I hire a professional for mold design?
Hire a professional when growth is extensive, hidden, or involves complex structures. Professionals provide containment, specialized removal, and documentation to protect health and property.
If growth is large or hidden, consider a professional evaluation and remediation.
What is the most important factor in mold design?
Moisture control is the core driver. Without reducing moisture, mold tends to return even after cleaning.
Keep moisture under control and address leaks swiftly.
How long does mold design remediation take?
Duration varies by space and severity. Smaller, contained areas may resolve within hours, while larger or complex cases can take days.
It depends on the space; expect several hours to days.
Can DIY mold remediation be effective?
DIY remediation can be effective for small, contained areas with proper safety measures and moisture control. Large or uncertain cases benefit from professional help.
For small problems, DIY with caution; for bigger issues, call a pro.
What about hidden mold behind walls?
Hidden mold requires careful assessment, often with professional inspection tools. Avoid disturbing hidden growth without proper containment.
Hidden mold needs expert evaluation and safe removal.
Watch Video
The Essentials
- Assess moisture sources before cleanup.
- Contain the work area to prevent spread.
- Choose remediation based on material and growth extent.
- Dry thoroughly to prevent recurrence.
- Document outcomes and schedule follow-ups.