How to Deal with Black Mold: Practical Remediation Guide
Learn safe, practical steps to identify, remediate, and prevent black mold in your home with expert guidance from Mold Removal Lab.

Quick Answer: You can safely deal with black mold by assessing moisture, sealing affected areas, wearing protective gear, and following a step-by-step remediation plan. Start with containment to prevent spread, then clean small patches with approved cleaners or hire a pro for larger growth. Always test for hidden moisture sources and document the process.
Understanding Black Mold and Risk
Black mold in homes typically refers to a group of mold species that may appear dark green or black and grow in damp conditions. The most commonly implicated species is Stachybotrys chartarum, but visual color alone is not a reliable indicator of danger. In any case, mold growth signals moisture problems that can affect indoor air quality and occupant health. According to Mold Removal Lab, moisture control is the foundation of safe mold remediation; without addressing the moisture source, mold returns even after cleaning. Visible growth is only the tip of the iceberg; invisible fungal colonies can live behind walls, under flooring, or inside drywall. For homeowners, the priority is to minimize exposure during cleanup, prevent spores from spreading to other rooms, and plan long-term moisture management to reduce recurrence.
healthy homes rely on monitoring humidity and promptly fixing leaks. By understanding how black mold behaves, you can plan a methodical response that protects family health and minimizes property damage. This guide emphasizes practical steps that homeowners and renters can implement with confidence, while recognizing when to seek professional help for safety and effectiveness. - Mold Removal Lab perspective and guidance helps frame the approach to all stages of remediation.
note
Tools & Materials
- N95 respirator or better(Fit-tested if possible; replace if damaged or soiled)
- Protective gloves(Nitrile or neoprene; avoid latex if sensitive)
- Safety goggles(Wraparound style recommended)
- Disposable coveralls or old clothing(Use to prevent clothing contamination)
- Plastic sheeting or tarps(To create containment barriers around the affected area)
- painter's tape(Seal edges of containment barriers)
- HEPA vacuum(Use for debris cleanup and drying areas)
- Non-porous cleaning agents(Mold-specific cleaner or a mild detergent solution)
- White vinegar (optional)(Can be used on non-porous surfaces; not a cure-all)
- Hydrogen peroxide 3% (optional)(Alternative for non-porous surfaces; test colorfastness first)
- Buckets, microfiber cloths, and scrub brushes(For scrubbing and drying surfaces)
- Moisture meter or hygrometer (optional)(Helps verify drying and moisture reduction)
- Trash bags rated for heavy loads(Leak-proof, sealable; place contaminated materials in bags)
Steps
Estimated time: 3-8 hours
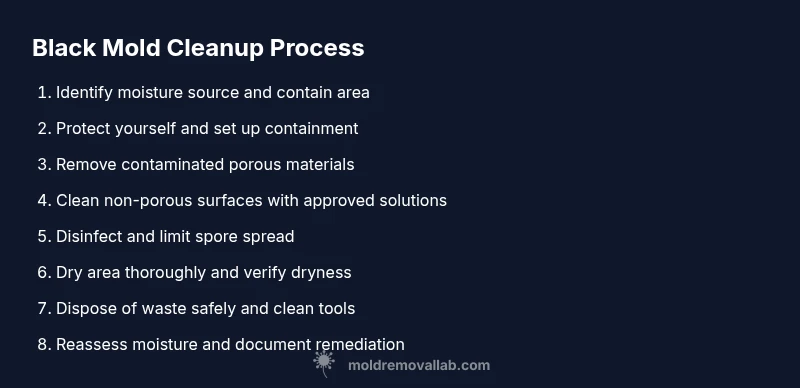
- 1
Identify moisture source and contain area
Locate the moisture source (leak, condensation, flood) and stop it if possible. Immediately contain the affected space with plastic sheeting to prevent mold spores from spreading to other rooms. Seal doorways and vents as needed, while allowing airflow out of the containment to a safe area.
Tip: Seal edges with tape and use a separate entry for the contaminated space to minimize cross-contamination. - 2
Put on PPE and prepare the space
Don all PPE before entering the contaminated area: N95 respirator, safety goggles, gloves, and coveralls. Remove clothing that may have mold spores, and set up your containment barriers. Turn off fans and HVAC in the affected zone to prevent spreading spores.
Tip: If you feel unwell or have mold allergies, pause and consider professional help. - 3
Remove porous materials with mold growth
Carefully bag and remove porous materials (drywall, carpet padding, insulation) that show mold growth. Place waste directly into heavy-duty bags and seal before disposal. Do not scrub porous materials that are severely contaminated; this can release spores into the air.
Tip: Double-bag and label waste as mold-contaminated before removal. - 4
Clean non-porous surfaces with approved solutions
Scrub non-porous surfaces (metal, glass, hard plastics) with a mold-approved cleaner or a detergent solution. Rinse and dry promptly to prevent resurfacing of mold. Avoid mixing cleaners with ammonia or bleach; follow manufacturer guidance and ensure good ventilation.
Tip: Use a microfiber cloth for effective dirt removal and less lint. - 5
Disinfect and neutralize remaining spores
On non-porous surfaces, you may apply a light disinfection or natural alternatives like vinegar in a diluted form where appropriate. Allow surfaces to dry completely before re-entry and avoid over-wetting shared spaces which can promote regrowth.
Tip: Always read product labels and test on a small area first. - 6
Dry the area thoroughly and verify dryness
Use fans and dehumidifiers to promote fast drying. Maintain a dry environment for 24–48 hours, depending on the space. Check for signs of lingering moisture (dampness, musty odor) and recheck with a moisture meter if available.
Tip: Keep doors open for airflow once initial decontamination is complete. - 7
Dispose of waste and clean tools
Remove and seal contaminated tools and disposable items in separate bags. Clean reusable tools with a mold-safe cleaner, then dry and store them away from mold-prone areas. Ensure the work area remains contained during disposal to prevent dispersal of spores.
Tip: Do not reuse contaminated PPE; dispose of it properly after use. - 8
Reassess and document the remediation
Take photos before, during, and after remediation to document the process. Record the date, moisture sources addressed, and the cleaners used. This documentation can assist future inspections and moisture-management plans.
Tip: Keep a simple log of readings and observations for ongoing maintenance. - 9
Implement moisture control and return-to-service plan
Develop a moisture-management plan to prevent future mold growth: fix leaks, improve ventilation, use dehumidifiers, and monitor humidity. Revisit areas after a few weeks to confirm dryness and absence of odors or visible growth.
Tip: Establish routine checks to catch moisture problems early.
FAQ
Is black mold always dangerous to health?
Mold can affect health, especially for those with allergies or asthma. Not all black-colored molds are dangerous, but many produce spores that irritate airways. If you have persistent symptoms or large growth, seek professional evaluation.
Mold exposure can irritate airways, especially for sensitive individuals; seek professional help for concerns.
Can I clean black mold myself, or should I hire a pro?
For small, contained patches on non-porous surfaces, DIY cleaning with proper PPE is possible. Larger areas, porous materials, or hidden growth require a licensed remediation specialist to ensure safety and prevent recurrence.
DIY is possible for small areas, but large or hidden mold should be handled by a pro.
What should I do about mold in HVAC systems?
Mold in ducts or the HVAC system requires professional assessment and cleaning to prevent spread through the home. Do not run cleaners deep into the system without guidance.
Mold in ducts needs professional cleaning to prevent spreading spores through the house.
How long does remediation typically take?
Duration depends on the extent of growth and moisture issues. Small jobs may finish in a day, while larger problems can take several days to ensure thorough drying and verification.
It varies, from a day for small jobs to multiple days for extensive remediation.
What signs indicate hidden mold growth?
Persistent musty odor, unexplained humidity, or damp spots behind walls or under floors can indicate hidden growth. If you suspect hidden mold, professional testing and inspection are advised.
Unseen mold may hide behind walls; a musty smell is a common clue.
Should I test for mold after cleanup?
Testing can confirm that mold levels are back to normal, especially in high-risk areas or after large incidents. Consider testing if symptoms persist or moisture issues recur.
Testing can verify that cleanup was successful and air quality is safe.
Watch Video
The Essentials
- Contain and control mold spread first
- Wear proper protection and follow safe cleaning protocols
- Address the moisture source to prevent recurrence
- Remove porous materials that cannot be cleaned safely
- Verify area is dry before re-occupying the space