Crawl Space Mold Removal: A Practical Home Guide
Learn how to safely remove crawl space mold with moisture control, containment, and thorough drying. Practical steps, PPE guidance, and prevention tips for homeowners from Mold Removal Lab.

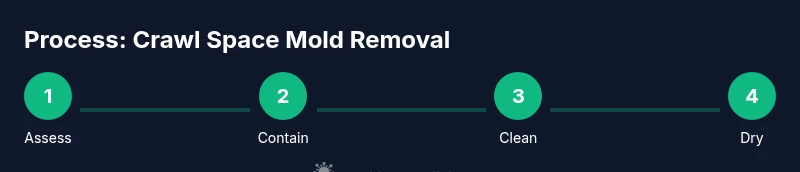
According to Mold Removal Lab, crawl space mold removal hinges on careful moisture control, containment, and complete drying. This guide provides a safe, step-by-step approach homeowners can follow to reduce mold growth, minimize dust, and protect indoor air quality. If mold shows signs of widespread infestation or your space is structurally compromised, consider professional remediation.
Why crawl space mold is a risk\n\nMold growth in crawl spaces is more than an aesthetic issue; it signals moisture problems that can spread to living spaces and affect indoor air quality. In many homes, humidity, poor ventilation, and water intrusion create the perfect environment for mold spores to take hold on wood, insulation, and concrete. Left unaddressed, mold can degrade structural materials and aggravate respiratory symptoms for occupants. The Mold Removal Lab team emphasizes that addressing the moisture source is as important as removing visible growth. This section explains why crawl space mold matters and outlines the connection between moisture control and lasting remediation. \n\nKey takeaway: moisture management is the foundation of effective crawl space mold removal.
Assessing moisture sources and risk\n\nBefore you remove mold, identify where moisture is coming from. Common culprits include roof leaks, plumbing faults, poorly sealed foundation vents, and high humidity during wet seasons. A simple moisture survey can include checking for damp insulation, standing puddles, and vapor buildup on concrete. Documentation matters: log moisture events, note areas with visible staining, and map the crawl space’s air flow. According to Mold Removal Lab Analysis, systematic assessment helps target remediation efforts and prevents recurring mold growth. Early detection reduces long-term costs and health risks.
Containment and safety prep\n\nContainment minimizes mold dust and spores from entering inhabited spaces. Start by shutting down HVAC systems in the affected area and sealing the access with heavy-duty plastic sheeting. Use tape rated for high-adhesion applications to create a tight seal around doors and vents. PPE is non-negotiable: wear an N95 or P100 respirator, eye protection, gloves, and disposable coveralls. Clean tools and containment barriers before moving to new areas to avoid cross-contamination. Proper containment reduces exposure risk for you and your household while you work.
Mold removal vs. material replacement\n\nNot all mold requires removing building materials, but porous items (insulation, drywall, or carpeting) that are mold-soiled may need replacement. Non-porous surfaces (metal, concrete) can often be cleaned and disinfected. Evaluate material condition: if wood studs are soft, warped, or chronically damp, removal may be the best long-term solution. The Mold Removal Lab approach blends cleaning with material replacement where needed, ensuring that remaining substrates stay dry and structurally sound. A conservative mindset minimizes repeat growth.
Cleaning and drying methods\n\nUse a two-step cleaning process: first, physically remove visible growth with disposable tools to avoid spreading spores. Then, apply an EPA-registered mold cleaner or a properly diluted antimicrobial solution to affected surfaces. Rinse and dry thoroughly—aim for surface dryness and ambient air during the drying phase. Dehumidifiers and high-velocity fans help accelerate drying, but avoid over-drying materials which can cause cracking. Monitoring moisture with a meter ensures you reach an acceptable dry state before sealing the space.
Repair, prevention, and long-term maintenance\n\nAfter remediation, seal moisture sources and improve ventilation to prevent recurrence. Repair roof or plumbing leaks promptly, reroute water away from the foundation, and install vapor barriers where appropriate. Insulation should be replaced with mold-resistant alternatives, and crawl space vents can be managed to balance humidity levels. Regular checks—especially after heavy rain or thaw cycles—help catch issues early. Mold Removal Lab recommends periodic moisture readings and a maintenance plan to keep crawl spaces healthy.
When to hire a professional\n\nSome mold situations exceed DIY capabilities. If you notice extensive growth, mold appearing on large areas, or if you have underlying health concerns, consult a licensed professional. A pro can perform a thorough assessment, contain the area with certified containment, and manage safe disposal of contaminated materials. The Mold Removal Lab Team supports escalation when debris volume or structural compromise indicates specialized remediation is needed to protect occupants.
Tools & Materials
- PPE kit (N95/P100 respirator, goggles, gloves, disposable coveralls)(Ensure proper fit and seal; change disposable gear between areas)
- Plastic sheeting and painter's tape(Heavy-duty, 6 mil or higher; create physical containment barrier)
- HEPA-filter vacuum(Vacuum only with HEPA filter; do not use standard vacuums)
- Mold-cleaning agents (EPA-registered fungicidal cleaner or detergent)(Follow label directions; avoid mixing cleaners)
- Disinfectant rinse or sanitizer(Optional for hard surfaces after cleaning)
- Disposal bags (heavy-duty)(Double-bag and seal for contaminated materials)
- Moisture meter or hygrometer(Monitor humidity and surface moisture)
- Dehumidifier and high-velocity fans(Place to optimize air flow without over-drying)
- Temp/airflow meter(Useful for optimizing conditions in larger crawl spaces)
- Drywall/insulation replacement materials(Only if replacement is necessary)
- Utility knife and cutting tools(For removing damaged materials)
- Plastic containment tape, duct tape(Seal seams and penetrations)
Steps
Estimated time: 4-12 hours for active remediation plus 24-72 hours of drying time
- 1
Assess preparation and safety
Identify the mold-affected area and confirm safety protocols. Gather PPE, seal the space, and plan the sequence to prevent cross-contamination. Document the extent of mold and moisture sources for reference.
Tip: Do a quick safety check at the entry and ensure kids/pets are kept away. - 2
Isolate the space
Build a plastic barrier around the crawl space opening and shut down HVAC if possible to prevent spores from spreading. Ensure access is restricted and signs are posted for household awareness.
Tip: Use a negative air pressure approach only if trained to maintain safe containment. - 3
Remove porous mold-damaged materials
Carefully remove insulation, drywall, or other porous materials that are visibly contaminated. Bag them securely in disposal bags before removal from the crawl space.
Tip: Take photos before removal to document site conditions for future reference. - 4
Clean non-porous surfaces
Wipe or scrub solid surfaces with an EPA-registered cleaner. Avoid scrubbing dust into the air; work in sections and dispose of dirty materials promptly.
Tip: Use disposable rags and tools for contaminated areas. - 5
Disinfect and rinse
Apply a disinfectant or antimicrobial as recommended by the cleaner label. Rinse if required by the product and allow surfaces to air-dry.
Tip: Do not mix cleaners; follow the label for contact time. - 6
Dry the crawl space thoroughly
Run dehumidifiers and fans to achieve low moisture levels. Monitor progress with a moisture meter and avoid condensation or damp patches.
Tip: Aim for consistent dryness across all materials, not just surface dryness. - 7
Repair and seal the space
Replace damaged insulation or drywall with mold-resistant materials. Seal gaps and ensure proper ventilation to prevent future moisture buildup.
Tip: Consider a vapor barrier and proper drainage away from the foundation. - 8
Re-assess and monitor
Recheck moisture and inspect for regrowth after a drying period. Schedule periodic checks to ensure the space remains dry.
Tip: Keep a simple log of humidity readings and visual inspections.
FAQ
What signs indicate crawl space mold needs remediation?
Visible growth, musty odors, damp insulation, water intrusion, and high indoor humidity are key indicators. If you notice any of these, begin moisture control and assessment before cleaning.
Visible growth, musty smell, or damp insulation indicate remediation is needed. Start by checking moisture sources and air quality.
What PPE should I wear for crawl space mold cleanup?
Wear an N95 or P100 respirator, protective goggles, gloves, and disposable coveralls. Ensure proper fit and replace if contaminated.
Wear a respirator, goggles, gloves, and coveralls. Fit matters for protection.
Can I remove mold by myself or should I hire a pro?
Small, contained mold growth on non-porous surfaces can be DIY with caution. Extensive growth, porous material damage, or health concerns warrant professional remediation.
Small areas can be DIY with caution; larger problems should be handled by professionals.
How long does crawl space mold remediation typically take?
Duration depends on extent, moisture, and space size. Active cleanup plus drying can span several hours to days; always ensure the area is thoroughly dry before completion.
Remediation can take hours to days depending on extent and drying time.
What maintenance helps prevent mold recurrence?
Control humidity, fix leaks promptly, improve ventilation, and install vapor barriers where appropriate. Schedule periodic checks for moisture and signs of new growth.
Control humidity, fix leaks, improve ventilation, and check regularly to prevent regrowth.
When is it unsafe to proceed with DIY cleanup?
If mold covers a large area, there is visible structural damage, or you have health risks, stop and contact a licensed professional for assessment and remediation.
If you're unsure or the area is large, stop and call a professional.
Watch Video
The Essentials
- Identify and fix moisture sources first
- Contain the space to prevent spread
- Use proper PPE and EPA-approved cleaners
- Dry thoroughly before sealing
- Plan for long-term prevention and monitoring