Which Mold to Use BG3: A Practical Removal Guide for Homes
Learn how to identify indoor mold, select safe EPA-registered cleaners, and remove mold safely in BG3-era homes. Practical steps, safety tips, and prevention guidance from Mold Removal Lab.

There isn’t a single mold you should "use" for BG3. Effective remediation depends on the surface, the extent of growth, and safety considerations. In this guide, you’ll learn how to identify common indoor mold, choose EPA-registered products, and apply proper cleanup steps to reduce risk. Always prioritize containment, dry-out, and professional help for large infestations.
Clarifying the question: which mold to use bg3
The phrase which mold to use bg3 is misleading for a remediation task. Mold growth isn’t something you select or "use"; it’s a sign of moisture and a health risk that needs removal. In practical terms, you identify the mold, select safe removal methods, and restore a dry, healthy living space. This section redefines the goal: identify the mold, select safe removal methods, and tailor your approach to minimize exposure. You’ll learn how experts categorize mold, what surfaces they affect, and how to tailor your approach to minimize exposure. Throughout, remember that safety and moisture control drive success.
How mold grows and why containment matters
Mold requires three elements: moisture, a suitable food source (like wood, drywall, or fabric), and a conducive temperature. When moisture lingers, mold colonies can establish themselves quickly and spread via air currents or incidental contact. Containment helps prevent spores from spreading to other rooms during cleanup. Use plastic sheeting to seal off the area, create a clean entry path for workers, and minimize air movement that could carry spores. Even small leaks behind walls can hide larger problems, so plan to inspect hidden areas and avoid disturbing existing mold more than necessary. This section covers common indoor molds and their typical surfaces, so you can decide whether professional help is needed.
Safety first: PPE and safe handling
Personal protective equipment (PPE) is your first defense against mold exposure. Wear a respirator approved for particulates, chemical-resistant gloves, goggles, and long sleeves. If you suspect mold growth behind insulation or in HVAC ducts, stop work and seek professional assistance. Work slowly, avoid dry sweeping, and keep children and pets away from the work zone. After cleaning, dispose of contaminated materials in sealed bags. This approach reduces inhalation exposure and limits cross-contamination.
Cleaning products: detergents, EPA-registered cleaners, and options
Not all cleaners are equal when it comes to mold. For non-porous surfaces like tile or metal, soap and water followed by a non-acid disinfectant can remove surface mold. Porous materials such as drywall may require more aggressive products or removal. EPA-registered fungicides and disinfectants are designed to target mold while minimizing hazards. Never mix cleaners; always follow label directions. Non-chlorine options like hydrogen peroxide or white vinegar can be suitable for minor growth on certain surfaces, but they are not universal cures. Always test a small area first and ventilate the space well during application.
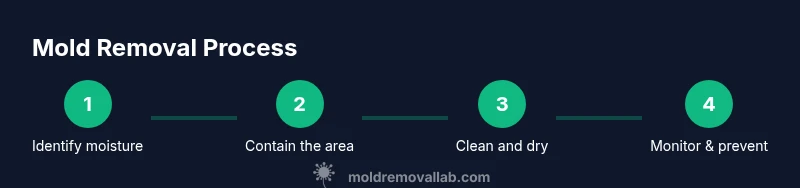
Step-by-step approach for typical home mold removal
A practical approach for small to moderate infestations is as follows: 1) Identify the moisture source and stop it. 2) Isolate the area with plastic sheeting. 3) Wear PPE and prepare cleaning solutions. 4) Scrub mold off non-porous surfaces with detergent, rinse, and disinfect. 5) Remove and bag damaged porous materials. 6) Dry the area thoroughly with fans or dehumidifiers. 7) Monitor for reoccurrence over the next weeks. This sequence minimizes spread and improves outcomes.
Drying, dehumidification, and preventing recurrence
Mold growth reappears when moisture returns. After cleaning, run dehumidifiers and ensure airflow reaches all affected zones. Maintain indoor humidity below 50%. Fix leaks promptly, insulate pipes, and vent bathrooms and kitchens to the outdoors. Regularly inspect high-risk areas (basements, crawl spaces, around windows) and address any signs of dampness quickly. A dry, controlled environment reduces mold regrowth and protects occupant health.
When to escalate: professional remediation and testing
For large infestations (more than a small area), mold growing within HVAC systems, or suspected problematic strains, professional remediation is advised. A licensed mold remediation contractor can assess unseen growth, perform advanced containment, and handle disposal according to regulations. If you’ve had recurring moisture problems or allergies worsen during cleanup, getting a professional opinion is prudent. Independent mold testing may be used to verify results after remediation.
Quick-start checklist for homeowners
- Stop moisture sources and contain the area
- Wear proper PPE and follow safety guidelines
- Use EPA-registered products appropriate for the surface
- Clean and disinfect visible mold; remove damaged porous materials
- Dry thoroughly and monitor humidity levels
- Re-inspect every few weeks to catch early signs of dampness
Tools & Materials
- PPE kit (respirator, goggles, gloves, coveralls)(NIOSH-approved respirator with P100 filters, chemical-resistant gloves, eye protection, long sleeves)
- Non-porous cleaning solution (soap or detergent)(Use on hard surfaces like tile, metal; follow label directions)
- EPA-registered mold cleaner or disinfectant(Follow label; ensure surface compatibility)
- Scrub brushes and rags(Plastic bristle brush for non-porous surfaces; disposable rags for contaminated materials)
- Plastic sheeting and tape(For containment and sealing off the work area)
- Waste bags (heavy-duty, sealable)(Double-bag contaminated debris; seal before disposal)
- Drying equipment (fans or dehumidifier)(Aid moisture removal after cleaning)
- Moisture meter or hygrometer(Helpful to monitor humidity and drying progress)
Steps
Estimated time: Total time: 2-4 hours for small areas; longer for larger infestations
- 1
Identify moisture source
Locate leaks, condensation points, or water intrusion that feeds mold growth. Stopping the moisture is crucial before you begin cleaning. Document findings so you can fix underlying problems and prevent recurrence.
Tip: Start with the highest-priority leak first and shut off the water supply if needed. - 2
Contain the area
Seal off the contaminated zone with plastic sheeting to prevent spores from spreading. Create a dedicated entry/exit path for workers and minimize air movement through doors. This helps keep other living spaces safer during cleanup.
Tip: Label containment barriers clearly and avoid moving through clean areas while you work. - 3
Put on PPE and prep solutions
Don PPE before handling any mold, and prepare cleaning solutions according to product labels. Clear the work area, keep pets away, and ensure proper ventilation to reduce inhalation risk.
Tip: Check respirator fit and replace filters if you feel airflow is compromised. - 4
Clean and disinfect non-porous surfaces
scrub visible mold with detergent on non-porous surfaces, rinse, then apply EPA-registered disinfectant. Allow contact time per label before wiping dry. Do not mix cleaners.
Tip: Always test a small area first to ensure no surface damage. - 5
Remove and bag porous materials
Carefully remove damaged porous materials (drywall, insulation) and seal them in heavy bags for disposal. Avoid shredding or blasting debris, which can release spores.
Tip: Place contaminated waste directly into sealed bags at the source. - 6
Dry the area thoroughly
Use fans or a dehumidifier to reduce humidity and promote complete drying. Continue until moisture readings show stable, low levels across all affected materials.
Tip: Aim for moisture levels below 50% humidity where possible. - 7
Monitor and prevent recurrence
After cleanup, regularly inspect the area for signs of dampness and mold regrowth. Maintain humidity controls and address any new water intrusion promptly.
Tip: Keep a moisture log for the first few weeks after remediation.
FAQ
Can I use bleach to remove all mold?
Bleach can be effective on non-porous surfaces for surface mold but it isn’t a universal solution for all materials. It may not reach mold inside porous materials like drywall and can even create fumes. Always test a small area and follow label directions; for porous materials consider removal or professional remediation.
Bleach helps on hard surfaces but isn’t a cure-all. Test first, read the label, and don’t rely on bleach for porous materials.
When should I hire a professional?
Consider a professional for large infestations, mold growth behind walls, HVAC contamination, or persistent moisture problems. A licensed contractor can assess unseen growth, contain the area safely, and dispose of contaminated materials properly.
If the mold covers a large area or you’re unsure, call a professional.
Is mold behind walls dangerous?
Mold behind walls can pose health risks and may indicate ongoing moisture problems. A professional assessment helps determine the extent and safe remediation methods, including containment and disposal.
Hidden mold can be serious; a pro can check behind walls safely.
How long does remediation take?
Remediation duration depends on the extent and location of mold. Small jobs may take a few hours, while larger or complex cases can require multiple days and follow-up to confirm dryness.
It varies, but professionals usually schedule cleanup in blocks over one to several days.
What humidity level prevents mold?
Maintaining indoor humidity below 50% generally helps prevent mold growth. Use dehumidifiers and good ventilation, especially in basements and bathrooms.
Keep humidity under about half to reduce mold risk.
Can I reuse materials after mold cleanup?
Materials contaminated by mold, especially porous items like drywall and insulation, should usually be removed and discarded to prevent regrowth. Non-porous surfaces can be cleaned and reused if fully dry.
Most porous materials should be discarded; non-porous items may be cleaned and reused once dry.
The Essentials
- Identify and stop moisture sources before cleaning
- Use PPE and follow product labels precisely
- Contain and isolate the work area to prevent spread
- Dry thoroughly to prevent recurrence
- Consider professional help for large or complex mold problems