Mold Removal and Mold Remediation: A Practical Home Guide
Learn practical, step-by-step strategies for mold removal and mold remediation to keep homes safe. This expert guide covers assessment, containment, cleaning, drying, restoration, and prevention for homeowners and renters.

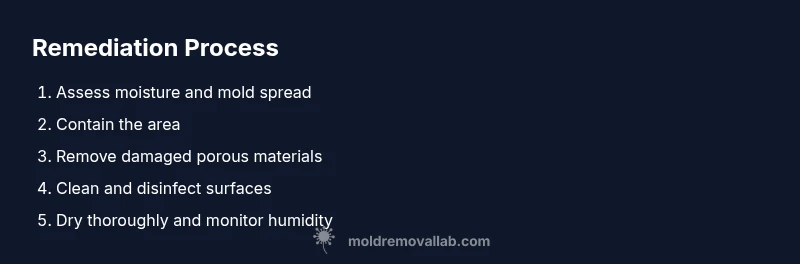
Mold removal and remediation are the coordinated processes of stopping moisture, assessing the spread, containing the area, cleaning contaminants, and restoring indoor conditions to prevent regrowth. Start by identifying moisture sources, sealing the zone, choosing appropriate cleaning methods, and implementing long-term moisture control to protect health.
Understanding mold removal and mold remediation
Mold removal and mold remediation are the integrated processes homeowners use to restore safety after moisture-driven mold growth. They go beyond simple cleaning to address moisture, air flow, containment, and long-term prevention. According to Mold Removal Lab, effective remediation starts with a clear plan, protects occupant health, and minimizes the chance of regrowth. The Mold Removal Lab team found that success hinges on rigor in moisture control, correct sequencing of steps, and using appropriate tools and cleaners.
In practice, mold remediation combines several activities: assessment, containment, cleaning, disinfection, drying, and restoration. The goal is not just to remove visible mold but to restore indoor air quality and structural integrity. This requires distinguishing between porous and nonporous materials, recognizing how humidity fuels regrowth, and following safety protocols to limit exposure. Homeowners should also prepare for documentation: before-and-after photos, humidity readings, and notes on materials replaced or cleaned. Throughout, the focus remains on preventing moisture accumulation and monitoring conditions over time. The journey from problem to safe home is proactive, not reactive, and aligns with evidence-based methods.
The Mold Removal Lab team emphasizes that each remediation plan should be tailored to the space, the extent of growth, and the occupants’ health needs. When done correctly, remediation reduces health risks and stabilizes indoor conditions for the long term.
Assessing mold extent and health risks
Mold growth varies in size and depth. Visible patches on walls are only part of the story; spores can spread behind surfaces and inside HVAC plenum. Based on Mold Removal Lab analysis, early detection reduces damage and remediation costs. Look for persistent odors, staining, water damage, peeling paint, or condensation on windows—classic signs of excess moisture. Use a moisture meter and humidity readings to quantify conditions. Record findings for contractor reference and to verify remediation success later. Consider health impacts: people with allergies, asthma, or immune issues may experience stronger symptoms and should approach remediation with extra caution. Before you begin cleanup, plan a containment zone with plastic sheeting, avoid aggressive scraping in enclosed spaces, and ventilate with fresh air from outside. Documentation of moisture sources and the affected areas helps track progress and supports any follow-up work.
Containment and remediation planning
Containment limits the spread of mold spores during cleanup. Create barriers, seal doors and ducts, and post warning signs. The plan should specify cleaning methods by surface type, disposal rules for contaminated materials, and the sequence of tasks. Evaluate if the space requires temporary relocation; for larger jobs, professional remediation is safer. The Mold Removal Lab team emphasizes documenting every step: photos, measurements, and material inventories. This documentation helps verify that all affected areas have been treated and replaced if necessary. A thoughtful plan also addresses moisture sources, such as leaks, ventilation shortcomings, or high humidity, and outlines a strategy to fix them permanently. Thorough planning reduces surprises during cleanup and keeps occupants safe.
Cleaning methods and material handling
Nonporous surfaces (glass, metal, sealed wood) respond well to detergent solutions and disinfection. Porous materials (drywall, carpet padding, insulation) contaminated by mold may need removal and disposal. Always use PPE, work from clean to dirty areas, and never mix cleaners with ammonia or bleach, which can release harmful gases. For surfaces, wipe and scrub with a brush, followed by HEPA vacuuming to capture residual spores. In some cases, mold growth on porous materials can be mitigated by encapsulants or mold-resistant coatings after removal. The key is to balance effective cleaning with minimizing exposure to spores and preserving structural integrity.
Practical tip: document disposal procedures and follow local regulations for hazardous waste. Safe disposal preserves health, minimizes cleanup costs, and reduces cross-contamination between rooms.
Drying and moisture control to prevent recurrence
Drying is essential. After cleaning, reduce ambient humidity using dehumidifiers and cross-ventilation, but avoid creating new water intrusion. Target consistent RH below 60% where possible. Run dehumidifiers for 24-72 hours in enclosed spaces, then recheck with a moisture meter. If dampness returns, re-evaluate the moisture source and repair promptly. Ongoing moisture control includes fixing leaks, improving insulation, and adjusting HVAC operation to prevent condensation. This phase is critical to prevent regrowth and extend the life of remediation work.
Long-term prevention involves routine checks, proper drainage around the home, and mindful humidity management during humid months. A proactive approach minimizes future mold problems and protects occupant health.
Restoration and prevention strategies
Once the space is dry, restore with materials designed to resist mold growth where appropriate. This may include mold-resistant drywall, epoxy coatings, or sealed concrete. Rebuild using clean, dry materials and verify that ventilation is adequate to avoid future humidity buildup. Implement a simple maintenance schedule: periodic humidity checks, poster reminders to address leaks, and routine inspections after heavy rains or rapid temperature shifts. The Mold Removal Lab team recommends integrating moisture monitoring into regular home maintenance and investing in source control (air sealing, improved drainage, and proper grading) to reduce the risk of mold returning. A robust prevention plan saves time and money over the long term and helps preserve indoor air quality for everyone in the home.
Tools & Materials
- Protective gear (N95 respirator, gloves, goggles)(Ensure proper fit; use P100 if visible mold is heavy)
- Plastic sheeting and painter's tape(Create containment barriers around the affected area)
- HEPA-rated vacuum(Use with a sealed system and avoid blowing dust)
- Mold-safe cleaning solutions (detergent + water; EPA-registered cleaner)(Non-ammonia cleaners preferred; avoid mixing cleaners)
- Scrub brushes, sponges, buckets(Non-porous tools preferred)
- Moisture meter or hygrometer(Helps verify drying progress)
- Dehumidifiers or fans(Keep space below 60% RH)
- Replacement materials for porous items (if necessary)(Only if contaminated beyond cleaning)
- Camera or smartphone for documentation(Record moisture and mold patches)
Steps
Estimated time: 2-5 days depending on scope
- 1
Identify moisture origin and mold extent
Document all visible mold growth and identify the moisture source. This helps you plan containment and remediation scope. If growth is hidden behind walls, proceed with caution and consider professional assessment.
Tip: Take photos from multiple angles; note dimensions - 2
Contain the area to prevent spread
Seal the room with plastic sheeting and tape; minimize foot traffic and isolate HVAC if possible. This reduces cross-contamination during cleaning.
Tip: Turn off HVAC to prevent spores spreading - 3
Stop the moisture source and start drying
Repair leaks or correct humidity source; begin drying with dehumidifiers and fans. Allow active moisture sources to be eliminated before proceeding with cleanup.
Tip: Use a moisture meter to confirm drying trend - 4
Remove or clean contaminated porous materials
Discard or carefully clean porous items (drywall, insulation) that are mold-damaged beyond cleaning. Non-porous surfaces can be cleaned with detergent solution and a scrub brush.
Tip: Seal waste in bags and dispose of per local guidelines - 5
Clean and disinfect contaminated surfaces
Wipe surfaces with detergent, then apply a disinfectant suitable for mold. HEPA vacuum removed dust and spores after cleaning to minimize recontamination.
Tip: Rinse and dry surfaces fully before re-insulating or repainting - 6
Dry space thoroughly and monitor progress
Continue dehumidification until RH stays below 60%. Re-run moisture assessments daily for 1-2 weeks to confirm ongoing dryness.
Tip: Keep windows closed and use fans away from mold-affected areas - 7
Restore and implement prevention
Replace removed materials with mold-resistant options if possible; seal joints and vents; implement moisture control strategies like improved ventilation and regular checks.
Tip: Address root causes to prevent recurrence
FAQ
Do I need to hire a professional for mold removal and remediation?
Large infestations, hidden mold, or mold in HVAC systems typically require professional remediation. If growth is limited to a small, clearly accessible area, DIY cleaning with caution can be possible.
For big or hidden problems, it's best to hire a professional.
Is remediation the same as removal?
Remediation encompasses cleanup, moisture control, and preventing recurrence, while removal focuses on eliminating visible mold. In practice, remediation includes removal of affected materials and corrective actions.
Remediation includes cleanup, containment, and prevention, not just cleaning.
How long does remediation take?
Remediation duration depends on the extent of growth and moisture management. Simple cases may take a few days; more extensive projects can extend for a week or more.
It varies from a few days to over a week depending on scope.
What safety precautions should I take?
Wear proper PPE, avoid disturbing mold, and ensure good ventilation. If you have allergies or respiratory conditions, limit exposure and consider professional help.
Wear PPE and limit exposure while cleaning.
Difference between cleaning and replacing materials?
Cleaning is suitable for nonporous surfaces; porous materials damaged by mold may require removal. Replacement helps prevent regrowth and ensures structural safety.
Some materials must be removed and replaced to stop mold.
Watch Video
The Essentials
- Identify moisture sources first
- Contain the area to prevent contamination
- Dry completely and monitor humidity
- Use proper cleaners and PPE for safety
- Plan long-term prevention to reduce recurrence