Blow Mold Wiseman: Mold in Blow-Molded Plastics — Practical Guide
Practical guide to mold in blow-molded plastics, with safety tips, prevention strategies, and a clear step-by-step remediation plan from Mold Removal Lab.

The term blow mold wiseman in this guide refers to mold growth concerns related to blow-molded plastics and how to address contamination safely. This article explains why blow-molded containers can harbor mold, how to detect it, and a practical remediation plan for homeowners and renters can follow without professional gear. It also covers prevention to keep plastics mold-free over time.
What Blow Mold Wiseman Means in Mold Remediation
According to Mold Removal Lab, the phrase blow mold wiseman highlights a common concern for households dealing with mold on blow-molded plastics. Blow-molded containers and parts, including bottles and storage items, are manufactured by blowing air into softened plastic. During that process, microscopic gaps and crevices can trap moisture, providing a hospitable environment for mold growth when humidity lingers. The Mold Removal Lab team found that even plastics that look clean on the surface can harbor hidden mold colonies in seams, under labels, or around threaded openings. Understanding this concept helps homeowners approach remediation with a realistic plan rather than assuming visible surface mold is the whole problem.
This guide focuses on safe, practical steps you can take at home to reduce moisture, clean affected surfaces, and prevent future growth, using common household supplies. While the term might seem obscure, the underlying principle is straightforward: moisture control, thorough cleaning, and timely drying are the pillars of successful remediation in blow-molded plastics.
Key takeaways: moisture control is essential, inspect seams and closures, and dry thoroughly to stop regrowth.
Why Blow-Molded Plastics Are Prone to Mold
Blow-molded plastics are used to create a wide range of consumer items, from beverage containers to storage bins. When these items have joints, threads, or recessed areas, they can trap moisture even after washing. If moisture remains for extended periods, it can foster mold spores that settle and grow. The organic matter found on plastics from handling can also serve as a nutrient source for mold. Warmer indoor temperatures combined with high humidity accelerates growth, especially in kitchens, bathrooms, garages, or basements where plastic items are stored.
The risk is not that blow-molded plastics are inherently moldy, but that improper drying and infrequent cleaning invite colonization. To reduce risk, keep items away from damp spaces, dry them completely after washing, and store them in dry environments with adequate air circulation. Mold growth on these plastics is typically localized to edges, threads, and inside hollow spaces where water can collect during use and cleaning.
How to Detect Mold on Blow-Molded Parts
Detection starts with a visual inspection: look for fuzzy growth, dark spots, discoloration, or a musty odor near seams, lids, or closures on blow-molded items. If you notice staining or a persistent smell, there may be hidden mold beneath labels or inside recessed cavities. A simple sanitation check involves wiping surfaces with a diluted cleaning solution and re-inspecting after drying. For porous interior materials, such as lids or stoppers made of certain plastics, consider using a quadrant sampling approach (smell, touch, and sight in multiple areas) to determine whether mold has spread beyond obvious surfaces.
If indoor air quality is a concern, use a basic moisture meter or humidity monitor in the storage area to track relative humidity. Keeping RH below 50% in living spaces reduces mold risk. For more thorough confirmation, Mold Removal Lab recommends professional testing if occupants have allergy symptoms, persistent coughs, or if mold covers larger areas or porous materials.
Prevention Strategies for Blow-Molded Plastics
Prevention is the best remediation. After washing blow-molded plastics, dry them completely with clean towels and air-dry in a well-ventilated area. Store items in dry, shaded spaces where humidity is controlled. Regularly inspect seals, lids, and threads for mold-friendly buildup and clean these areas with a soft brush and mild dish soap. Rotate stored items to minimize prolonged contact with any moisture in corners. Consider silica gel packets or dehumidifiers in storage cabinets to reduce ambient humidity in the month following cleaning.
If an item is heavily contaminated or has porous components that cannot be effectively cleaned, it’s safer to dispose of it and replace with a non-porous alternative. Prevention also includes routine cleaning of containers after spills or leaks and avoiding prolonged storage of damp items in closed boxes or drawers. A consistent maintenance routine dramatically lowers the chance of recurring mold in blow-molded plastics.
Safety, PPE, and Home Ventilation
Always wear gloves (nitrile or latex), an N95 mask, and eye protection when cleaning moldy plastics. Work in a well-ventilated area to avoid inhaling spores, and consider using a fan to promote airflow away from your breathing zone. Do not mix bleach with ammonia; instead, use a dedicated cleaning solution suitable for plastics. If you plan to use disinfectants, test a small, inconspicuous area first to ensure there is no surface damage.
Ventilation remains crucial: open windows or run an exhaust fan during cleaning and drying, and avoid storing mold-prone items in damp basements or garages without climate control. After cleaning, wash hands and change clothes to prevent spreading spores to other areas of the home.
When to Seek Professional Help
If mold covers large areas, if you notice persistent allergic symptoms, or if blow-molded items are heavily degraded or structurally compromised, seek professional remediation. A certified mold specialist can assess hidden growth behind labels, in hollow cavities, and within insulation or gasket regions where DIY methods may not reach. In cases of suspected toxic mold (such as black mold), professionals have the tools to perform air sampling and remediation with containment and proper disposal.
Professional help is especially wise for households with young children, elderly residents, or immune-compromised individuals. Mold Removal Lab emphasizes that early intervention reduces health risks and minimizes damage to belongings.
Common Myths and Misunderstandings
- Myth: All mold on plastic is harmless and can be wiped away. Reality: Mold can penetrate tiny crevices and require thorough cleaning to prevent regrowth.
- Myth: Bleach kills all mold on plastics. Reality: Bleach is not always effective on porous surfaces and can damage some plastics; use product-appropriate cleaners.
- Myth: If you can’t see mold, you’re safe. Reality: Hidden mold behind labels or inside cavities can still release spores into the air.
- Myth: Mold on blow-molded plastics is always a sign of water damage. Reality: Condensation, high humidity, and improper drying after washing can create favorable conditions even without visible water intrusion.
Case Study: Hypothetical Scenario
Consider a family store with several blow-molded storage bins used in food preparation. After washing, several bins remained damp in a cabinet for days. A musty odor emerged, and a light green mold appeared along threads and inside a recessed lid. The store implemented a remediation plan using soap and water, hydrogen peroxide, and thorough drying in a dry, ventilated area. After two weeks, the shelves were mold-free, with regular inspections to prevent recurrence. This scenario illustrates how basic steps, done consistently, can avert larger mold problems in blow-molded plastics.
Tools & Materials
- N95 respirator(Fit-tested if possible; replace if soiled or damp)
- Nitrile gloves(Pair for cleaning and handling contaminated items)
- Disposable coveralls(Protect skin and clothing from spores)
- Spray bottle(Fill with cleaning solution (mild soap + water) or a disinfectant suitable for plastics)
- Mild dish soap(Non-abrasive, safe for plastics)
- Hydrogen peroxide 3%(As a disinfectant option; do not mix with bleach)
- White vinegar(Alternative disinfectant; use sparingly on colored plastics)
- Soft brush or sponge(Gentle scrubbing to lift mold from crevices)
- Microfiber cloths(Lint-free and reusable after washing)
- Plastic scraper/brush(For stubborn residue in seams)
- Waste bags(Seal and dispose of contaminated materials safely)
- Dehumidifier or fan(Promotes drying and air circulation)
- Moisture meter or hygrometer(Tracks humidity levels during remediation)
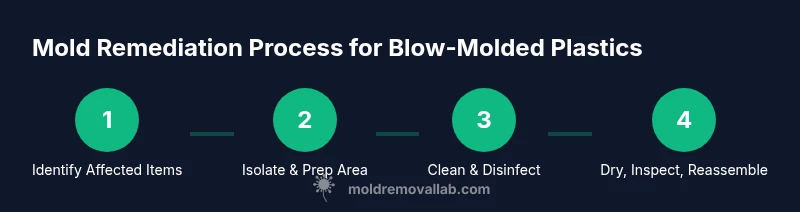
Steps
Estimated time: 1-2 hours
- 1
Prep and protect the workspace
Put on PPE and seal off the area to prevent spores from spreading to other rooms. Set up ventilation by opening a window or running a fan away from your breathing zone. Gather all items you’ll clean and place contaminated waste in a sealed bag.
Tip: Use disposable drop cloths to catch drips and keep cleanup contained. - 2
Isolate the moldy piece
Move only the affected blow-molded item to the designated cleaning area. If multiple items are involved, work one at a time to limit cross-contamination. Inspect seals and crevices for mold pockets.
Tip: Do not attempt to clean porous components that show deep discoloration or structural damage. - 3
Clean the surface with soap and water
Mix a mild soap solution and scrub the exterior and accessible interior cavities with a soft brush. Rinse with clean water and pat dry with a microfiber cloth. Repeat if visible residue remains.
Tip: Avoid harsh abrasives that could scratch the plastic. - 4
Disinfect and dry thoroughly
Apply hydrogen peroxide or vinegar solution to the cleaned surfaces and allow to sit for several minutes before wiping dry. Use a fan or dehumidifier to speed up drying; ensure all areas reach low moisture before storage.
Tip: Never mix cleaners; follow product instructions for dwell time. - 5
Inspect and reassemble
Reassemble any removed components only after complete drying. Check for lingering odor and signs of regrowth. If odor persists, consider repeating the cleaning cycle or replacing the item if necessary.
Tip: If odors persist after remediation, consider air testing or professional assessment.
FAQ
What is blow-molded plastic, and why does it matter for mold remediation?
Blow-molded plastic is produced by blowing air into heated plastic to create hollow items. Mold can grow in seams, threads, and recessed areas where moisture collects. Understanding this helps you target cleaning and drying in the right spots.
Blow-molded plastic is made by blowing air into softened plastic to form hollow items. Mold tends to hide in seams and crevices where moisture collects, so focus on those areas during cleaning.
Can I clean mold from blow-molded containers myself?
Yes, for small, non-porous blow-molded items with light mold growth. Use mild soap, rinsing, and thorough drying. If there’s any porous material, persistent odor, or large growth, seek professional help.
Yes, for simple cases with non-porous plastics. If growth is heavy or penetrating porous parts, call a professional.
What are signs of hidden mold in blow-molded plastics?
Look for dark spots inside crevices, musty odors, or discoloration under labels. Mold can hide inside lids, threads, and recessed cavities where it’s hard to reach with a wipe.
Watch for hidden spots in seams or inside lids where you can’t wipe easily, and a lingering musty smell.
Is mold on blow-molded plastics dangerous?
Mold can trigger allergies and respiratory issues, especially for sensitive individuals. It’s important to remove mold safely, ventilate the area, and minimize exposure.
Mold can affect breathing and trigger allergies, so take it seriously and clean carefully.
How long does remediation take for blow-molded plastics?
Removal time depends on the extent of growth and drying time. A small job may take a few hours; larger problems could extend over several days with repeated cleaning and drying sessions.
A few hours for small jobs; a few days if the mold is widespread and drying takes longer.
Watch Video
The Essentials
- Mold in blow-molded plastics is usually moisture-driven and can hide in seams.
- Deep cleaning plus thorough drying is essential to prevent regrowth.
- Use PPE and proper ventilation to reduce inhalation risk during cleanup.
- Dispose of heavily contaminated porous parts and replace when necessary.
- Preventive storage and regular checks dramatically reduce future mold risk.