How to Fix Mold Poisoning: Practical Home Remediation Guide
A practical, step-by-step guide to addressing mold poisoning safely at home. Learn health risks, when to seek medical help, and how to safely remediate and prevent recurrence.

This guide helps you identify mold poisoning risks, assess symptoms, and safely remediate affected areas at home. You’ll learn containment steps, cleaning and drying methods, and when to call a professional. By following this process, occupants reduce exposure and prevent recurrence—emphasizing safety, documentation, and medical guidance as needed. The Mold Removal Lab team supports practical, home-based steps while noting when experts must step in.
Understanding Mold Poisoning: Health Risks and Signs
Mold poisoning represents a health risk that can affect anyone in a moisture-damaged environment. Exposure may trigger allergic reactions, coughing, throat irritation, nasal congestion, or asthma-like symptoms. In sensitive individuals—such as children, the elderly, or people with compromised immune systems—effects can be more pronounced. Symptoms may appear gradually after repeated exposure or a single prolonged exposure during a moisture event like a leak or flood. Recognizing the signs early helps prevent progression. According to Mold Removal Lab, mold poisoning is not merely a housekeeping issue; it’s a health concern that benefits from documented remediation and careful monitoring to protect occupants and prevent cross-contamination.
Assessing the Situation: DIY vs. When to Hire Professionals
Not every mold problem requires professional remediation, but large infestations, hidden growth, or certain toxic species demand expert intervention. Begin with a thorough survey of visible mold, moisture sources, and ventilation. Use basic moisture assessment tools to identify damp zones and track humidity changes. If you must enter a recently flooded space or you encounter widespread growth, contact a qualified remediator. For households with vulnerable occupants, err on the side of caution and involve a professional early. The Mold Removal Lab Team recommends documenting the scope with photos and measurements before, during, and after any work to guide decisions and provide a clear containment record.
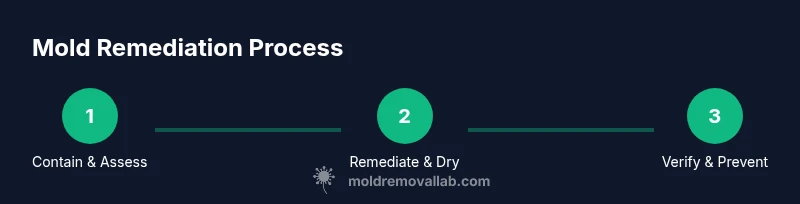
Step-by-Step Remediation Overview
A structured plan reduces risk and ensures you address the root moisture problem. Start with containment to prevent spores from spreading, then isolate the work area with plastic sheeting and negative pressure where feasible. Next, identify and remove the most contaminated materials, clean the remaining surfaces with appropriate cleaners, and thoroughly dry the space using dehumidifiers and fans. Finally, verify the area is dry, reassemble as needed, and implement a prevention plan to maintain low humidity and good ventilation.
Cleaning and Drying Techniques for Safe Remediation
Effective remediation relies on proper cleaning and rapid drying. Use EPA-approved cleaners or a mild detergent solution to scrub non-porous surfaces; porous materials that are severely moldy should be removed and disposed of in sealed bags. Avoid mixing cleaners and never apply strong agents to porous materials that might release more spores. After cleaning, use a HEPA-filtered vacuum to capture residual spores, then dry the area completely. Continuous drying for 24–72 hours may be necessary, depending on space size and material porosity. Maintain steady air movement and monitor humidity to ensure a moisture level that discourages regrowth.
Prevention and Maintenance to Stop Recurrence
Prevention centers on controlling moisture, improving ventilation, and routine inspections. Fix leaks promptly, use exhaust fans in bathrooms and kitchens, and keep indoor humidity below roughly 50–60% where feasible. Regularly inspect areas prone to dampness, such as basements, crawl spaces, bathrooms, and laundry rooms. Consider air filtration or dehumidification in poorly ventilated spaces. Documentation of moisture events, remediation steps, and humidity readings helps maintain preventive momentum and provides a reference if issues recur.
Tools & Materials
- N-95 respirator(tight-fitting, NIOSH-rated)
- gloves(nitrile, long-cleeved; chemical resistant)
- eye protection(goggles or face shield)
- plastic sheeting(to seal off the area)
- tape (polyethylene masking tape)(to secure plastic barriers)
- heavy-duty trash bags(for contaminated materials)
- HEPA vacuum(with sealed attachments)
- detergent or mold-cleaning solution(follow label directions; avoid ammonia on surfaces)
- buckets and scrub brushes(for scrubbing surfaces)
- microfiber cloths(for wiping and drying)
- dehumidifier or fans(to promote drying after cleaning)
- moisture meter/hygrometer(optional for humidity monitoring)
- sealed waste container(for disposal of contaminated materials)
Steps
Estimated time: Estimated total time: 6-12 hours for small areas; larger spaces may require 1-2 days with professional assistance
- 1
Contain the work area
Establish a containment zone using plastic sheeting and doors to prevent spores from spreading to other rooms. Seal gaps with tape and maintain negative pressure if possible. This step protects residents and makes the cleanup safer and more predictable.
Tip: Seal air gaps thoroughly; even small openings can allow cross-contamination. - 2
Put on PPE
Don an N-95 respirator, goggles, and gloves before touching any moldy material. PPE reduces inhalation exposure and protects your skin. Do not skip this step in visible growth areas.
Tip: Check respirator fit; a poor seal defeats protection. - 3
Identify and remove contaminated materials
Carefully separate porous materials with visible mold growth for disposal in sealed bags. Non-porous items can often be cleaned and salvaged with proper technique. Avoid disturbing mold-insulated areas unnecessarily.
Tip: Label bags clearly and keep waste contained during transport. - 4
Clean the surfaces
Scrub non-porous surfaces with a detergent solution or EPA-approved cleaner. For porous materials that cannot be salvaged, remove and dispose of them safely. Rinse with clean water and dry promptly.
Tip: Never mix cleaners; follow product directions and use clean tools. - 5
Dry the area thoroughly
Use dehumidifiers and fans to drive moisture out of the space. Monitor humidity to ensure it stays below the target level, and keep airflow steady until surfaces are dry to the touch.
Tip: Run dehumidifiers continuously until humidity stabilizes. - 6
Verify dryness and monitor
Perform follow-up checks for moisture and visible mold. Use a moisture meter if available and re-check after 24–72 hours. Confirm conditions are safe before reoccupying.
Tip: Document readings and photos for future reference. - 7
Document and plan prevention
Create a remediation log, including photos, dates, and measurements. Develop a prevention plan focused on moisture control, ventilation improvements, and routine inspections to reduce recurrence risk.
Tip: Share the plan with all household members and post-emergency steps.
FAQ
What is mold poisoning, and how does it occur?
Mold poisoning refers to health effects from inhaling or touching mold spores and mycotoxins in water-damaged spaces. Symptoms vary and can include respiratory issues, allergies, or headaches. It occurs when moisture supports mold growth and spores become airborne.
Mold poisoning comes from breathing in mold spores after moisture damage, which can trigger respiratory and allergy symptoms. Symptoms vary by person.
When should I seek medical care for mold exposure?
If you experience persistent or severe symptoms such as shortness of breath, chest tightness, high fever, or systemic reactions, contact a healthcare provider. For vulnerable individuals, seek medical attention promptly after moisture events and visible mold.
If symptoms are severe or don’t improve, see a doctor right away, especially if you’re at higher risk.
Can I safely clean mold poisoning myself?
DIY cleaning is possible for small, contained areas with intact containment and proper PPE. Complex infestations, hidden growth, or porous materials require professional remediation to ensure safety and effectiveness.
DIY is possible for small problems, but big infestations should be handled by pros.
Is bleach effective for mold removal on porous surfaces?
Bleach is not always effective on porous materials and can create moisture problems. Use cleaners appropriate for the surface and remove porous materials when necessary. Always follow product directions and safety guidelines.
Bleach isn’t a universal fix for porous surfaces; use surface-appropriate cleaners and remove damaged material when needed.
How can I prevent mold recurrence after remediation?
Control humidity, fix leaks promptly, improve ventilation, and inspect regularly. Maintaining a dry, well-ventilated environment lowers the chance of mold returning.
Keep humidity low, fix leaks quickly, and monitor spaces prone to dampness to prevent mold return.
Watch Video
The Essentials
- Contain the area before starting cleanup to prevent spread.
- Use proper PPE and follow label directions for cleaners.
- Thoroughly dry the space to prevent mold regrowth.
- Document all steps and monitor humidity after remediation.
- Know when to escalate to professionals for safety.